已添加
登录/注册
稿定 AI 图片作品
ch3n!~es
2026.01.12
编辑
[第5屏] Installation steps demonstration. Show three simple steps to install this wall-mounted soap dispenser. Split the screen into three horizontal sections, each for one step, with step title and simple illustration. Step 1: Drill Wall Holes, show marking and drilling. Step 2: Fix Bracket, screw the wall bracket on. Step 3: Install Dispenser, place the bottle onto the bracket. All text in English, simple clear style, white background. Each step has a small visual guide, keep product style consistent with original. 97:30 wide ratio, 1940x600, 4K, text clear. Negative: wrong steps, blurry, Chinese characters.
1q08ohs24h11osvep-HB
使用商品详情页技能根据商品图「图片1」「图片1」「图片1」「图片1」「图片1」「图片1」「图片1」生成1套详情页,参考图为,商品名称为Soap Dispenser,卖点为Zinc Alloy + Frosted Glass,Soap Dispenser Set with Pump,Wall Mounted,Chrome,Detachable Design,适配平台为亚马逊,图片比例为4:3,需求屏数为8张,其他要求为
1q08ohs24h11osvep-HB
继续生成
1qibmj3g7t9PyBRA-HB
[Screen 5] Installation steps demonstration for wall-mounted soap dispenser. [Style] Clear step-by-step guide, clean layout, easy to follow, all English. [Layout] Three steps arranged vertically from top to bottom. Step 1: Mark and drill the wall. Step 2: Fix the wall bracket with screws. Step 3: Install the soap bottle onto the bracket. Simple icons next to each step. Keep the product appearance consistent with original images. [Background] Light off-white #f8f8f8, clean background, highlight steps. [Text] Top title: "Simple Three-step Installation", each step: Step 1 "Mark Position & Drill Hole", Step 2 "Fix Bracket with Screws", Step 3 "Install Dispenser Bottle". Text clear, large enough to read, all English. [Size] 4:3, 4K resolution. [Negative] Chinese characters, wrong product shape, blurry steps, messy layout.
1q08ohs24h11osvep-HB
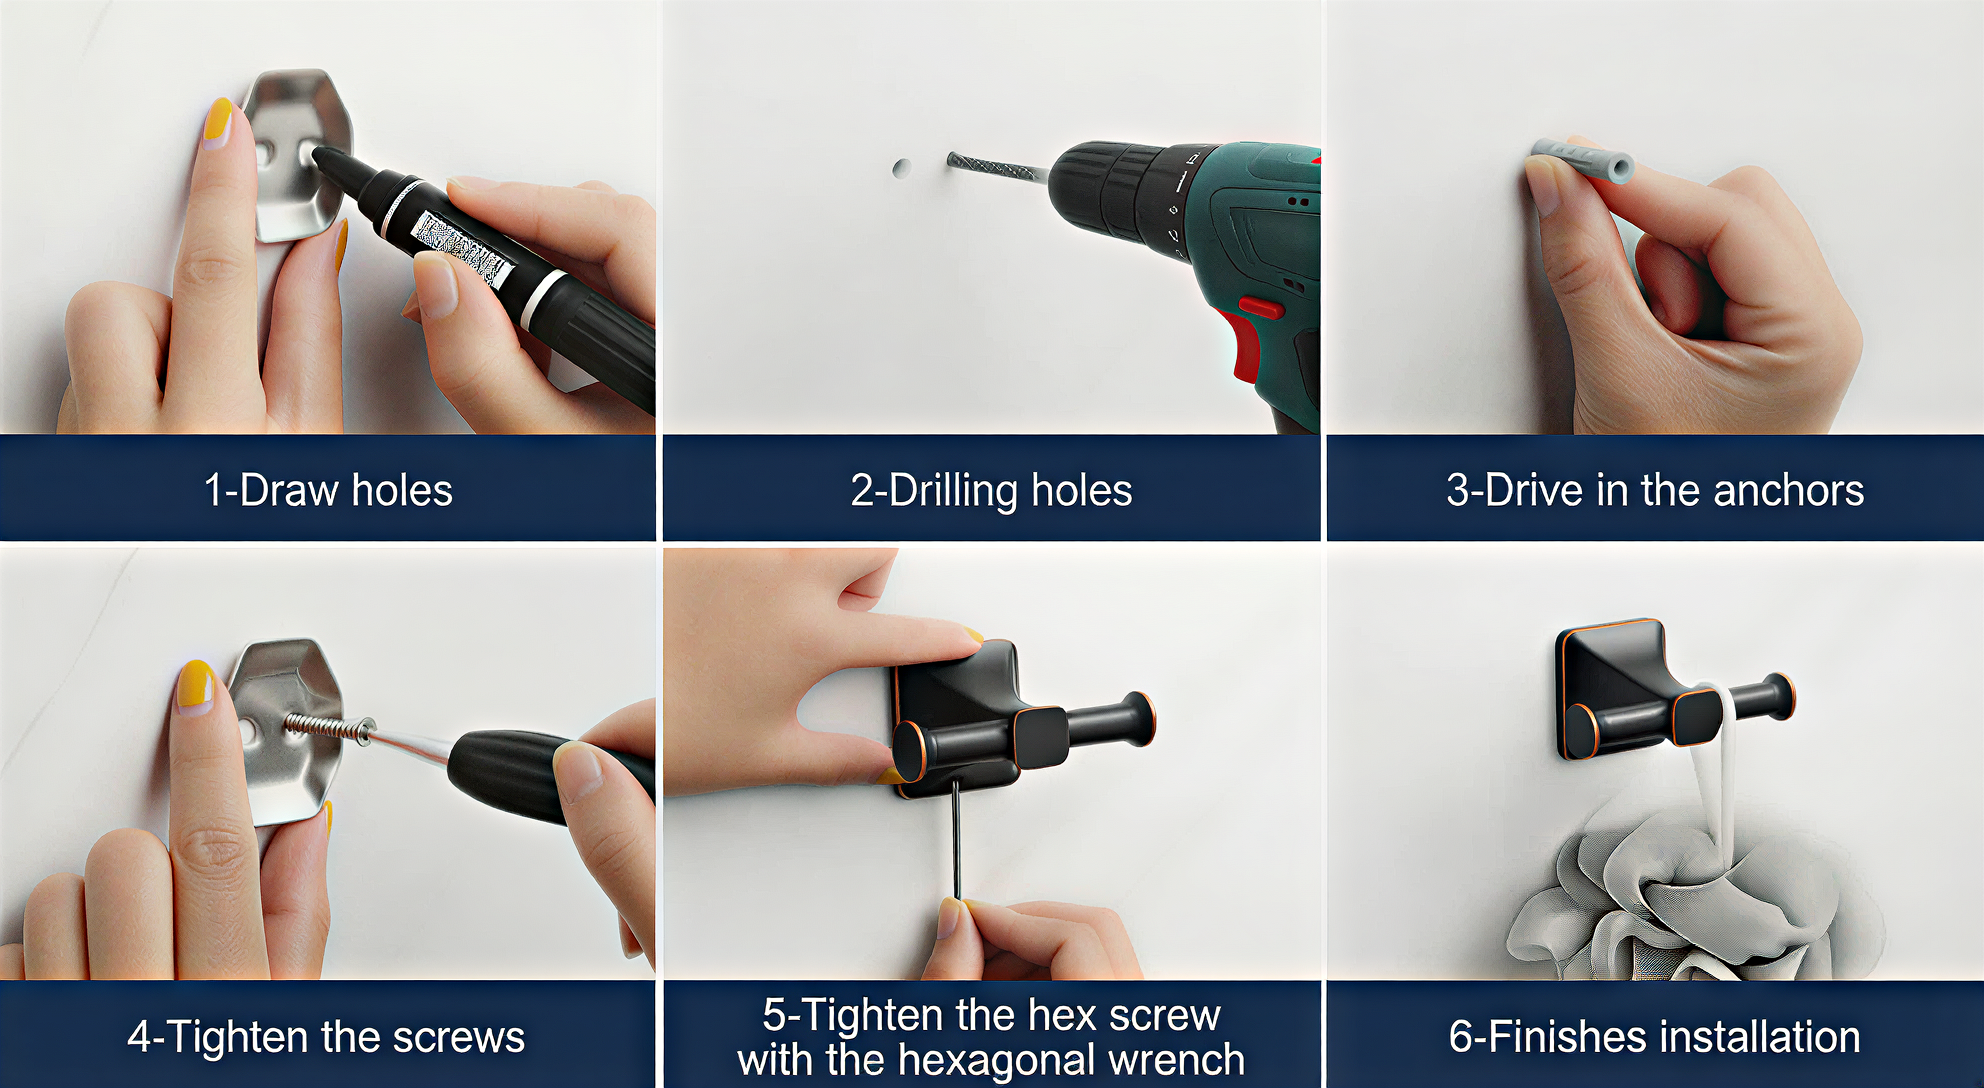
[第5张] 亚马逊详情页三种安装方式 - 安装步骤演示。本张使用【图2】【图3】【图4】作为安装步骤参考,提取三种安装方式:悬挂、猫眼、上墙。 [氛围/风格] 清晰教程风,步骤明确易读。 [元素布局] 画面分为上中下三栏,每栏对应一种安装方式:上栏悬挂安装(免打孔)- 4小步图示;中栏猫眼安装 - 4小步图示;下栏上墙安装 - 4小步图示;每栏左侧标题+步骤小图;背景浅灰背景,白色步骤图为白色卡片式布局。 [光影质感] 均匀明亮,步骤图清晰易读。 [配色色系] 全局底色 #F5F6F7;主色深灰;辅助色橙黄标题色标题色标题色条;白色步骤图白底。 [视角构图] 三栏纵向布局,每栏左标题+步骤小图横向排列。 [文字版式] 全英文。每栏大标题:"1. Hanging Installation (No Drilling)"、"2. Peephole Installation"、"3. Wall Mount Installation";每步配Step 1/2/3/4编号+简短说明文字;步骤图清晰展示手部操作动作。 [比例分辨率] 1:1方形,4K分辨率。 [负向提示词] 中文字符,文字错乱,步骤不清,水印,产品变形。
袁法存
重新生成
1q08ohs24h11osvep-HB
Amazon cross-border e-commerce detail page, product features and details showcase, 16:9 ratio, 4-column layout with rounded corner cards, title at top: "EXQUISITE DETAILS", each column shows a close-up detail of bathroom hardware with feature description below: Column 1 - close-up of mounting bracket with cross-section inset showing SUS304 stainless steel pipes, text: "Premium SUS304 Stainless Steel"; Column 2 - towel ring with rotation arrow indicator showing 180 degree swivel function, text: "180° Rotatable Towel Ring"; Column 3 - layered surface diagram showing baking paint, chromium, nickel, polishing layers, text: "Multi-Layer Surface Treatment"; Column 4 - wall mounting installation with screws and anchors shown, text: "Wall-Mounted Installation | Durable & Sturdy", matte black finish, clean white background, professional product technical illustration style, English text, Amazon product detail page, high quality rendering
1r45eznk6nLt2KKQ-HB
现代感金属风设计,简洁明了的3D步骤图,展现科技感安装体验,突出产品实用与未来感细节。
用户P15VBaii
基于参考图的复古铸铁钥匙挂钩,生成安装方式说明图,分两步展示:左侧步骤展示在墙面标记打孔位置,右侧步骤展示用螺丝将挂钩固定在墙面上,背景为浅色墙面。顶部居中悬浮英文主标题"Easy To Install",每个步骤旁标注对应文字:"1. Mark Position"、"2. Screw Fixing",文字为黑色无衬线字体,直接悬浮于背景,无任何底框,产品外观与原图完全一致
GD494915840
[商品] 使用【图1】灰色圆形硅胶防撞颗粒产品图;保留圆形扁平形状、灰色硅胶材质、背胶属性;步骤图中展示颗粒被手指捏持、粘贴的真实状态。 [画面] 页面目标:安装步骤演示,强调操作简单无需工具。构图:横向三步流程,顶部标题区,下方STEP 1-2-3横向排列。主体:每步配欧美成人手部动作特写——STEP1:用酒精棉片清洁柜门表面;STEP2:手指捏起一颗颗粒撕下离型纸;STEP3:手指将颗粒按压在柜门内侧边角。每步下方配简短说明。景别:手部动作中近景。阅读动线:顶部标题→从左到右三步流程。前中后景:背景渐变、中层三步场景图、前景步骤编号与文字。 [视觉] 套系策略:风格=跨境极简专业商业摄影;标题字=现代无衬线粗体(英文字体);正文字=简洁无衬线体;主色=深炭灰+中灰;背景延展=基于深炭灰到浅灰的竖向渐变,带细腻磨砂质感;强调色=亮青色(仅用于步骤数字圈、引线和重点标签);标题色=白色;正文色=浅灰;组件=亮青色圆形步骤编号、圆角步骤图边框、步骤说明文字卡;光影=每步场景内自然柔光,手部真实肤色质感。 [文字] 顶部主标题"Easy 3-Step Installation",副标题"No Tools Required";三步分别标注:"Step 1 - Clean & Dry Surface"、"Step 2 - Peel Off Backing"、"Step 3 - Press Firmly & Wait";全部横向排版。 [规格] 图片比例9:16竖版,4K,负向提示:避免变形、错字、文字过小、中文文字、亚洲手部/面孔、产品颜色改变、安装动作不真实、绝对化宣传语。
1qegyxuo94YQxAwQ-HB
效果不错
用户P15VBaii
Strictly follow the installation step layout of the seventh reference image, for the white caterpillar suction cup shower holder. Main title "Installation Steps", four steps: 1. Remove shower hose, 2. Insert and tighten the shower holder, 3. Stick the shower firmly on the wall, 4. Installation complete. Keep the four-grid layout, show the installation process, all text in English, product is white as original, 800x800 size.
1qibmj3g7t9PyBRA-HB
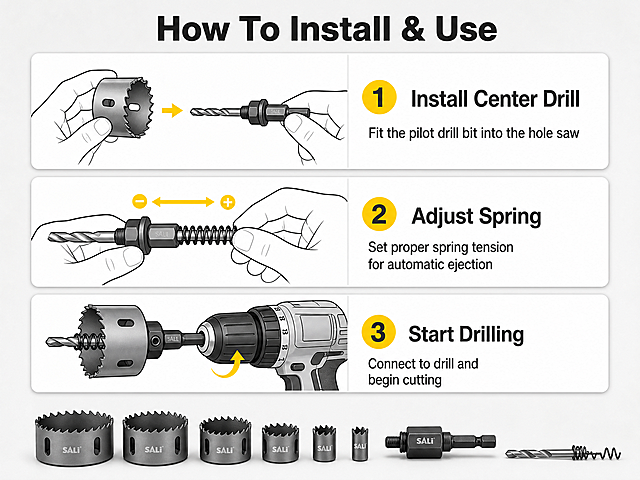
[第3屏] 亚马逊详情页适用场景展示,多功能钻头适用不同材质钻孔演示。本屏使用【图1】作为产品主体。 [氛围/风格] 写实应用场景,真实使用质感,直观清晰展示。 [元素布局] 顶部标题区,下方四格拼图,分别展示在玻璃、瓷砖、木材、轻质墙上钻孔场景,钻头产品置于画面底部居中展示,每个场景配简短说明。产品外观与输入图保持一致。 [光影质感] 自然环境光,每个场景光线均匀,产品清晰突出。 [配色色系] 全局底色 #f0f2f5,主色低饱和场景色,深灰标题文字。 [视角构图] 每个场景小图保持一致构图比例,整体均衡排版,动线从上到下。 [文字版式] 顶部主标题 "Suitable For Multiple Materials",每个场景小图下方标注对应材质名称,配马来文翻译,文字大小适中,不遮挡场景内容。 [比例分辨率] 9:16竖版比例,4K分辨率,文字清晰可辨,高清画质。 [负向提示词] 变形,水印,文字错乱,文字过小,缺件错件,结构错误,颜色偏差,背景杂乱,中文字符
GD550392596
动作改成双手摁在墙板上,粘贴牢固
GD1627475956
欧美跨境电商详情图,展示灰色可折叠脸盆挂钩免打孔安装过程,背景为干净的浴室墙面,突出"No Drilling Needed"英文卖点,产品严格按照原图样式,画面无多余产品
1qibmj3g7t9PyBRA-HB
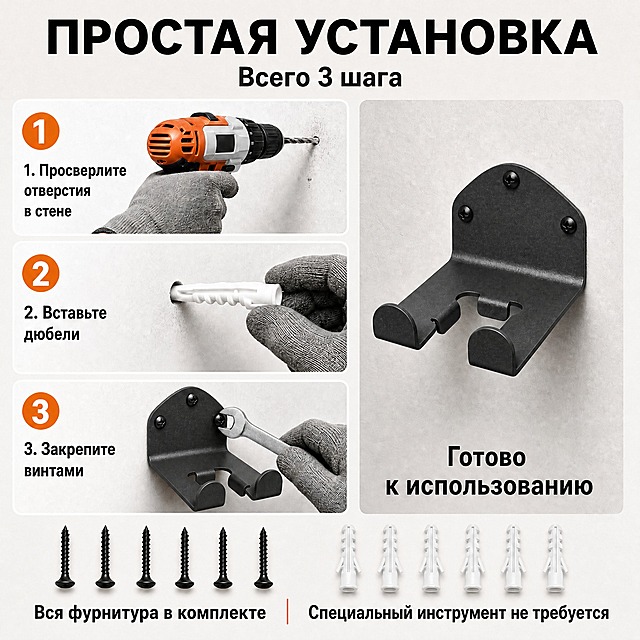
将图中所有橙色的墙上工具挂架产品全部替换为哑光黑色,包括右侧主挂架和第3步中的挂架产品,保持产品的形状、结构、尺寸、安装孔位、U型挂钩完全不变,只改变颜色为纯哑光黑色。步骤编号、文字、电钻、膨胀管、螺丝、手套、扳手等其他所有元素都保持原样不变。产品的黑色哑光涂层质感要真实,有细腻的磨砂质感,边缘有轻微高光体现金属立体感。
景明63393
[主图-6] 安装步骤流程图,黑色马桶喷枪纸巾架安装指引。 [氛围风格] 亚马逊跨境专业说明图,清晰易懂,步骤分明,浅灰背景,简洁专业。 [画质] 超高清商业插画与摄影结合质感,步骤图清晰,产品真实,文字锐利。 [元素] 浅灰色干净背景,画面分为上中下三步横排布局,每步包含编号、小图与说明文字。第一步:定位打孔,展示墙面标记与安装底座,配膨胀螺丝与螺丝配件;第二步:固定主体,展示将纸巾架主体固定在墙面上的状态;第三步:连接软管与喷枪,展示进水接口连接、喷枪挂入支架的完成状态。每步小图为真实产品渲染,保持外观与输入产品图一致。画面顶部有主标题,底部展示最终安装完成的完整产品图。 [光影] 均匀明亮的影棚光线,每步小图光线一致,整体清晰干净。 [配色] 主色哑光黑+浅灰背景,编号圆形底用深灰色,文字深灰与白色对比。 [视角构图] 顶部标题区,中部三步横排(编号在上,小图在中,说明在下),底部完成态大图,结构清晰有逻辑。 [文字版式] 顶部主标题大号粗体英文"Easy Installation 3 Steps"。三步分别标注"Step 1: Mark Drill Holes"、"Step 2: Mount the Bracket"、"Step 3: Connect Hose Sprayer"。每步下方有一行简短英文说明。底部完成态旁标注"All Hardware Included"。全部英文,无衬线字体,清晰可读。 [输出要求] 1:1比例,2048px*2048px,文字清晰,超高清专业说明图质感。 [负向提示词] 变形,文字错乱,产品模糊,背景杂乱,水印,中文,人物面部。
1q4g8s6mbc2ngquph-HB
Two installation methods infographic main image. Split layout on clean white-gray background. Top has bold English title "2 Installation Methods". Left side shows 3M adhesive pad installation: close-up of the oval base back with blue 3M foam adhesive pad, labeled "3M Adhesive Mount" below. Right side shows glue installation: tube of sealant glue and auxiliary sticker, labeled "Sealant Glue Mount" below. Center top shows the assembled black and gold toilet paper holder product. Bottom has small text "No Drilling No Damage to Walls". Keep product appearance (oval base shape, gold and black colors) exactly consistent with input product image. Clean infographic style, commercial product photography quality, balanced two-column layout. All text in English. 1:1 square ratio. Negative: deformed, Chinese text, blurry, watermark.
1q4g8s6mbc2ngquph-HB
「图片1」参考图片风格,重新生成画面内容,我的产品为「图片1」
1qg84tbiguE1ehJA-HB
产品名称照片磁铁制作机,销售到美国,语言用英语,帮我生成一组亚马逊套图,涵盖主图、生活方式、卖点总览、场景图、材质工艺、尺寸参数
我叫土豆🥔又土又逗😝
根据第一张产品来设计生成欧美跨境电商详情页10张,并且800X800PS尺寸,英文要突出,要展示产品的不同的特性,用切片的方式做详情页,产品不要切,只是利用切片的效果来做详情页 这个产品是洗发水壁挂架沐浴露皂液器跨境免打孔浴室拖鞋置物架壁挂式无痕,产品表达效果在二到四张
1qibmj3g7t9PyBRA-HB
严格保留原图产品样式的不锈钢挂钩安装展示图,欧美跨境电商风格,简洁背景,展示原图挂钩粘贴在墙面的过程,用醒目的英文标注"No Drilling Installation",突出免打孔便捷性,无白底,800X800尺寸
GD710319684
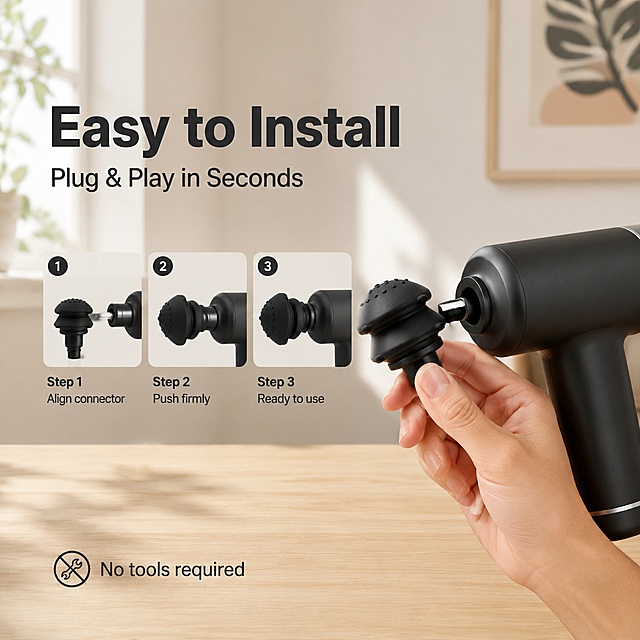
亚马逊主图第4张,使用场景与安装演示图。浅木色桌面+浅色墙面背景,温馨家居运动场景感。产品为黑色硅胶筋膜枪按摩头,保持与输入产品图外观、结构、材质、颜色完全一致。画面右侧展示一只手(仅手部局部,自然握持)将按摩头插入黑色筋膜枪机身的安装动作,筋膜枪机身简洁现代,按摩头对准接口即将插入。左侧上方大号英文标题:"Easy to Install",下方副标题:"Plug & Play in Seconds",再下方3步编号步骤图(小图横向排列):Step 1 "Align connector"、Step 2 "Push firmly"、Step 3 "Ready to use"。底部小字:"No tools required"。整体风格生活化但专业,光线自然柔和,场景真实可信。禁止出现多余的手、畸形手、手指扭曲、文字错乱、水印、电商平台Logo。
GD721308327
严格保留原图产品样式的不锈钢挂钩规格参数图,欧美跨境电商风格,简洁背景,展示原图挂钩,清晰列出尺寸、材质、承重等参数,英文标注"Product Specifications",信息直观,无白底,800X800尺寸
GD710319684
保留图片的所有信息和文字,只替换背景配色和风格。背景色:浅米色 / 奶油色 / 浅暖白色,与商品详情页的浅色调保持一致,干净明亮。 整体风格:现代简约、专业电商产品图,光线柔和均匀,突出产品主体。
1qpy5myvrx7Bf-2Q-HB


![[第5屏] Installation steps demonstration. Show three simple steps to install this wall-mounted soap dispenser. Split the screen into three horizontal sections, each for one step, with step title and simple illustration. Step 1: Drill Wall Holes, show marking and drilling. Step 2: Fix Bracket, screw the wall bracket on. Step 3: Install Dispenser, place the bottle onto the bracket. All text in English, simple clear style, white background. Each step has a small visual guide, keep product style consistent with original. 97:30 wide ratio, 1940x600, 4K, text clear. Negative: wrong steps, blurry, Chinese characters.](https://gd-cms.dancf.com/gd-cms/xi19e5/0/62c6673a-f67a-493f-893d-0b372ea8bb7d133.png?x-oss-process=image/resize,w_640,type_6/sharpen,120/interlace,1)


![[Screen 5] Installation steps demonstration for wall-mounted soap dispenser.
[Style] Clear step-by-step guide, clean layout, easy to follow, all English.
[Layout] Three steps arranged vertically from top to bottom. Step 1: Mark and drill the wall. Step 2: Fix the wall bracket with screws. Step 3: Install the soap bottle onto the bracket. Simple icons next to each step. Keep the product appearance consistent with original images.
[Background] Light off-white #f8f8f8, clean background, highlight steps.
[Text] Top title: "Simple Three-step Installation", each step: Step 1 "Mark Position & Drill Hole", Step 2 "Fix Bracket with Screws", Step 3 "Install Dispenser Bottle". Text clear, large enough to read, all English.
[Size] 4:3, 4K resolution.
[Negative] Chinese characters, wrong product shape, blurry steps, messy layout.](https://gd-cms.dancf.com/gd-cms/xi19e5/0/c0737620-0cf6-4951-8855-a12c4f9b675f3833.png?x-oss-process=image/resize,w_640,type_6/sharpen,120/interlace,1)
![[第5张] 亚马逊详情页三种安装方式 - 安装步骤演示。本张使用【图2】【图3】【图4】作为安装步骤参考,提取三种安装方式:悬挂、猫眼、上墙。
[氛围/风格] 清晰教程风,步骤明确易读。
[元素布局] 画面分为上中下三栏,每栏对应一种安装方式:上栏悬挂安装(免打孔)- 4小步图示;中栏猫眼安装 - 4小步图示;下栏上墙安装 - 4小步图示;每栏左侧标题+步骤小图;背景浅灰背景,白色步骤图为白色卡片式布局。
[光影质感] 均匀明亮,步骤图清晰易读。
[配色色系] 全局底色 #F5F6F7;主色深灰;辅助色橙黄标题色标题色标题色条;白色步骤图白底。
[视角构图] 三栏纵向布局,每栏左标题+步骤小图横向排列。
[文字版式] 全英文。每栏大标题:"1. Hanging Installation (No Drilling)"、"2. Peephole Installation"、"3. Wall Mount Installation";每步配Step 1/2/3/4编号+简短说明文字;步骤图清晰展示手部操作动作。
[比例分辨率] 1:1方形,4K分辨率。
[负向提示词] 中文字符,文字错乱,步骤不清,水印,产品变形。](https://gd-cms.dancf.com/gd-cms/xi19e5/0/cd8ad686-d222-4cf0-9c02-a4132abba17e825.jpeg?x-oss-process=image/resize,w_640,type_6/sharpen,120/interlace,1)






![[商品] 使用【图1】灰色圆形硅胶防撞颗粒产品图;保留圆形扁平形状、灰色硅胶材质、背胶属性;步骤图中展示颗粒被手指捏持、粘贴的真实状态。
[画面] 页面目标:安装步骤演示,强调操作简单无需工具。构图:横向三步流程,顶部标题区,下方STEP 1-2-3横向排列。主体:每步配欧美成人手部动作特写——STEP1:用酒精棉片清洁柜门表面;STEP2:手指捏起一颗颗粒撕下离型纸;STEP3:手指将颗粒按压在柜门内侧边角。每步下方配简短说明。景别:手部动作中近景。阅读动线:顶部标题→从左到右三步流程。前中后景:背景渐变、中层三步场景图、前景步骤编号与文字。
[视觉] 套系策略:风格=跨境极简专业商业摄影;标题字=现代无衬线粗体(英文字体);正文字=简洁无衬线体;主色=深炭灰+中灰;背景延展=基于深炭灰到浅灰的竖向渐变,带细腻磨砂质感;强调色=亮青色(仅用于步骤数字圈、引线和重点标签);标题色=白色;正文色=浅灰;组件=亮青色圆形步骤编号、圆角步骤图边框、步骤说明文字卡;光影=每步场景内自然柔光,手部真实肤色质感。
[文字] 顶部主标题"Easy 3-Step Installation",副标题"No Tools Required";三步分别标注:"Step 1 - Clean & Dry Surface"、"Step 2 - Peel Off Backing"、"Step 3 - Press Firmly & Wait";全部横向排版。
[规格] 图片比例9:16竖版,4K,负向提示:避免变形、错字、文字过小、中文文字、亚洲手部/面孔、产品颜色改变、安装动作不真实、绝对化宣传语。](https://gd-cms.dancf.com/gd-cms/xi19e5/0/b06d4afa-a070-4b6e-85b4-5dbb0dbde5b342656.jpeg?x-oss-process=image/resize,w_640,type_6/sharpen,120/interlace,1)



![[第3屏] 亚马逊详情页适用场景展示,多功能钻头适用不同材质钻孔演示。本屏使用【图1】作为产品主体。
[氛围/风格] 写实应用场景,真实使用质感,直观清晰展示。
[元素布局] 顶部标题区,下方四格拼图,分别展示在玻璃、瓷砖、木材、轻质墙上钻孔场景,钻头产品置于画面底部居中展示,每个场景配简短说明。产品外观与输入图保持一致。
[光影质感] 自然环境光,每个场景光线均匀,产品清晰突出。
[配色色系] 全局底色 #f0f2f5,主色低饱和场景色,深灰标题文字。
[视角构图] 每个场景小图保持一致构图比例,整体均衡排版,动线从上到下。
[文字版式] 顶部主标题 "Suitable For Multiple Materials",每个场景小图下方标注对应材质名称,配马来文翻译,文字大小适中,不遮挡场景内容。
[比例分辨率] 9:16竖版比例,4K分辨率,文字清晰可辨,高清画质。
[负向提示词] 变形,水印,文字错乱,文字过小,缺件错件,结构错误,颜色偏差,背景杂乱,中文字符](https://gd-cms.dancf.com/gd-cms/xi19e5/0/17be480e-a491-4382-a82b-fe8ae16fe12a3443.jpeg?x-oss-process=image/resize,w_640,type_6/sharpen,120/interlace,1)



![[主图-6] 安装步骤流程图,黑色马桶喷枪纸巾架安装指引。
[氛围风格] 亚马逊跨境专业说明图,清晰易懂,步骤分明,浅灰背景,简洁专业。
[画质] 超高清商业插画与摄影结合质感,步骤图清晰,产品真实,文字锐利。
[元素] 浅灰色干净背景,画面分为上中下三步横排布局,每步包含编号、小图与说明文字。第一步:定位打孔,展示墙面标记与安装底座,配膨胀螺丝与螺丝配件;第二步:固定主体,展示将纸巾架主体固定在墙面上的状态;第三步:连接软管与喷枪,展示进水接口连接、喷枪挂入支架的完成状态。每步小图为真实产品渲染,保持外观与输入产品图一致。画面顶部有主标题,底部展示最终安装完成的完整产品图。
[光影] 均匀明亮的影棚光线,每步小图光线一致,整体清晰干净。
[配色] 主色哑光黑+浅灰背景,编号圆形底用深灰色,文字深灰与白色对比。
[视角构图] 顶部标题区,中部三步横排(编号在上,小图在中,说明在下),底部完成态大图,结构清晰有逻辑。
[文字版式] 顶部主标题大号粗体英文"Easy Installation 3 Steps"。三步分别标注"Step 1: Mark Drill Holes"、"Step 2: Mount the Bracket"、"Step 3: Connect Hose Sprayer"。每步下方有一行简短英文说明。底部完成态旁标注"All Hardware Included"。全部英文,无衬线字体,清晰可读。
[输出要求] 1:1比例,2048px*2048px,文字清晰,超高清专业说明图质感。
[负向提示词] 变形,文字错乱,产品模糊,背景杂乱,水印,中文,人物面部。](https://gd-cms.dancf.com/gd-cms/xi19e5/0/752aa682-62b5-4107-afce-f7aeead4c6075261.jpeg?x-oss-process=image/resize,w_640,type_6/sharpen,120/interlace,1)