已添加
登录/注册
帮我将黄色底色变成粉色
帮我将黄色底色变成粉色
69w633p5hhu...
2026.02.04
做同款
帮我将黄色底色变成粉色
69w633p5hhuhKTA-HB
[第5张] 亚马逊详情页三种安装方式 - 安装步骤演示。本张使用【图2】【图3】【图4】作为安装步骤参考,提取三种安装方式:悬挂、猫眼、上墙。 [氛围/风格] 清晰教程风,步骤明确易读。 [元素布局] 画面分为上中下三栏,每栏对应一种安装方式:上栏悬挂安装(免打孔)- 4小步图示;中栏猫眼安装 - 4小步图示;下栏上墙安装 - 4小步图示;每栏左侧标题+步骤小图;背景浅灰背景,白色步骤图为白色卡片式布局。 [光影质感] 均匀明亮,步骤图清晰易读。 [配色色系] 全局底色 #F5F6F7;主色深灰;辅助色橙黄标题色标题色标题色条;白色步骤图白底。 [视角构图] 三栏纵向布局,每栏左标题+步骤小图横向排列。 [文字版式] 全英文。每栏大标题:"1. Hanging Installation (No Drilling)"、"2. Peephole Installation"、"3. Wall Mount Installation";每步配Step 1/2/3/4编号+简短说明文字;步骤图清晰展示手部操作动作。 [比例分辨率] 1:1方形,4K分辨率。 [负向提示词] 中文字符,文字错乱,步骤不清,水印,产品变形。
袁法存
[商品] 使用【图1】灰色圆形硅胶防撞颗粒产品图;保留圆形扁平形状、灰色硅胶材质、背胶属性;步骤图中展示颗粒被手指捏持、粘贴的真实状态。 [画面] 页面目标:安装步骤演示,强调操作简单无需工具。构图:横向三步流程,顶部标题区,下方STEP 1-2-3横向排列。主体:每步配欧美成人手部动作特写——STEP1:用酒精棉片清洁柜门表面;STEP2:手指捏起一颗颗粒撕下离型纸;STEP3:手指将颗粒按压在柜门内侧边角。每步下方配简短说明。景别:手部动作中近景。阅读动线:顶部标题→从左到右三步流程。前中后景:背景渐变、中层三步场景图、前景步骤编号与文字。 [视觉] 套系策略:风格=跨境极简专业商业摄影;标题字=现代无衬线粗体(英文字体);正文字=简洁无衬线体;主色=深炭灰+中灰;背景延展=基于深炭灰到浅灰的竖向渐变,带细腻磨砂质感;强调色=亮青色(仅用于步骤数字圈、引线和重点标签);标题色=白色;正文色=浅灰;组件=亮青色圆形步骤编号、圆角步骤图边框、步骤说明文字卡;光影=每步场景内自然柔光,手部真实肤色质感。 [文字] 顶部主标题"Easy 3-Step Installation",副标题"No Tools Required";三步分别标注:"Step 1 - Clean & Dry Surface"、"Step 2 - Peel Off Backing"、"Step 3 - Press Firmly & Wait";全部横向排版。 [规格] 图片比例9:16竖版,4K,负向提示:避免变形、错字、文字过小、中文文字、亚洲手部/面孔、产品颜色改变、安装动作不真实、绝对化宣传语。
1qegyxuo94YQxAwQ-HB
把图片中的文字翻译成英语,不改变商品尺寸大小,输出图片
1qoqmg4wwpa9UEQQ-HB
根据第一张产品来设计生成欧美跨境电商详情页10张,并且800X800PS尺寸,英文要突出,要展示产品的不同的特性,用切片的方式做详情页,产品不要切,只是利用切片的效果来做详情页 这个产品是洗发水壁挂架沐浴露皂液器跨境免打孔浴室拖鞋置物架壁挂式无痕,产品表达效果在二到四张
1qibmj3g7t9PyBRA-HB
修改这张安装步骤图中右下角第4步的小图:透明离型膜上印有蓝色"on floor"英文字符,撕起来的透明膜片上带有清晰的蓝色文字;已经撕掉透明膜后露出的黑色胶面是纯黑色,上面没有任何字符;还没撕掉的部分,蓝色文字印在透明膜上、透过膜显示在黑色胶底上。保持原图的手、地垫、灰色包边、毛绒背景、木质地板、光影和整体风格完全不变,只修改第4步右下角小图的文字印刷逻辑,真实自然,电商产品摄影质感
GD207730565
修改这张安装步骤图中右下角第4步的小图:透明离型膜上印有蓝色"on floor"英文字符,撕起来的透明膜片上带有清晰的蓝色文字;已经撕掉透明膜后露出的黑色胶面是纯黑色,上面没有任何字符;还没撕掉的部分,蓝色文字印在透明膜上、透过膜显示在黑色胶底上。保持原图的手、地垫、灰色包边、毛绒背景、木质地板、光影和整体风格完全不变,只修改第4步右下角小图的文字印刷逻辑,真实自然,电商产品摄影质感
GD207730565
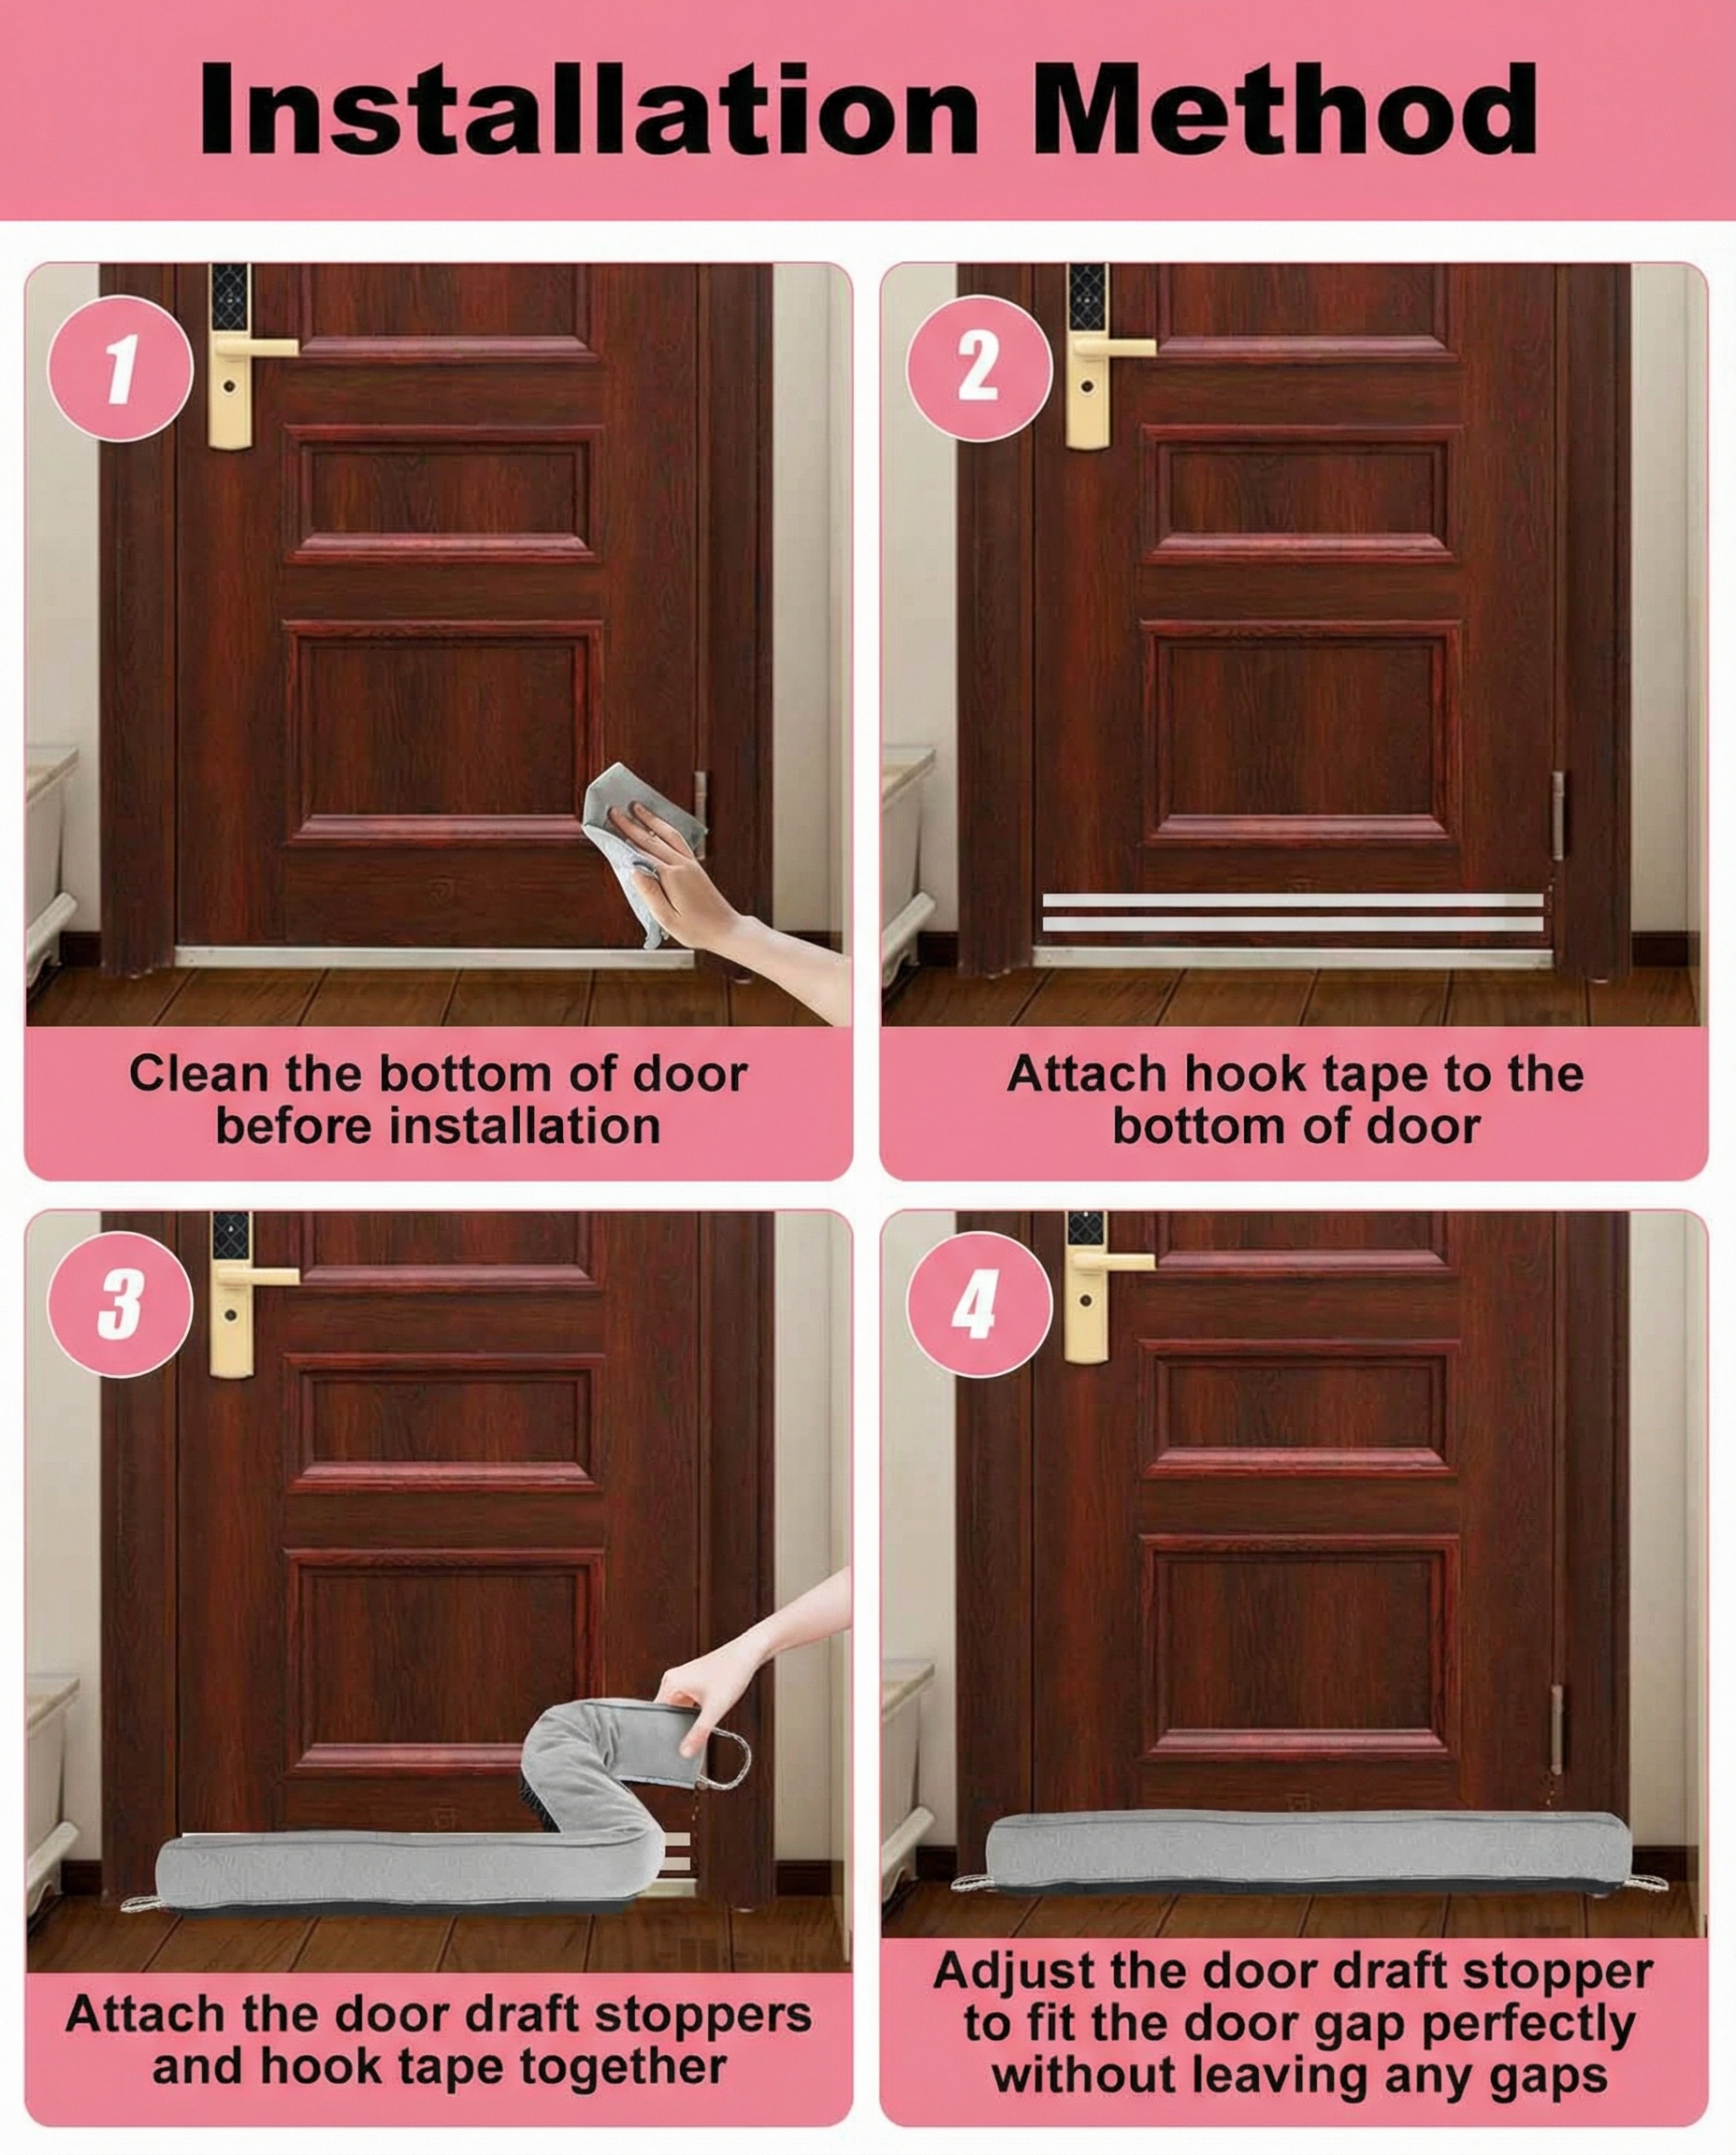
[垫图]:https://gdesign-dam-hz.dancf.com/35917502791928896/52f4ac459bb04828a8fb41bfde29a643.jpg 产品外观必须和原图保持100%一致,不得修改。主图主题: Easy Self-adhesive Installation, 氛围风格: Simple step-by-step tutorial style, bright and clean, 画面元素: Slice layout, three slice areas from top to bottom show the installation steps: 1. Clean the door gap 2. Peel off the backing paper 3. Paste and press, the product is completely displayed in the last slice area, the product itself is not cut, the overall picture is coherent. 配色色系: Light gray background, white product, dark text, simple and clear. 视角构图: Flat overhead view, clear steps. 文字版式: Each step is marked with number and title "1. CLEAN", "2. PEEL", "3. PRESS", the title is bold, the text is clear, the position does not block the product display. 分辨率: 2K
1qibmj3g7t9PyBRA-HB
优化重绘这张安装步骤图,保留原有四步安装流程和对应文字说明,优化画面清晰度和质感,提升整体排版美观度,文字"Installation Steps"保留,让步骤展示更清晰高级
GD899491528
现代感金属风设计,简洁明了的3D步骤图,展现科技感安装体验,突出产品实用与未来感细节。
用户P15VBaii
2:3竖版长条排版,轻奢极简卫生间实景,自然光柔和干净,分步展示真人手部实操贴膜全过程(只露手部,不露人脸);第一步:手拿抹布清洁擦拭浴室镜框边角,去除灰尘水渍;第二步:撕开上传的仿真木纹贴纸背胶,对齐镜框边缘精准定位;第三步:顺着镜框弧度贴合按压,木纹纹理环绕衔接自然;第四步:用刮板刮平贴纸、排出气泡,边角收边服帖;严格还原上传的产品图,包括包装设计、颜色、LOGO位置、文字内容、图案元素等所有细节,贴纸纹路逼真还原实木肌理,哑光高级质感,无塑料感,每一步画面清晰分区,步骤简洁易懂,8K超写实高清,居家生活化实操氛围,字体极简标注步骤小字,不遮挡操作细节与木纹纹理。负面提示词:人脸出镜、手部畸形、动作僵硬、木纹假纹重复、高光反光、贴纸翘边起鼓、胶水溢胶、画面杂乱、水印、低清晰度、色彩艳丽刺眼、人物穿搭违和、多余装饰、步骤混乱、非 2:3 比例
1qxbhqm2p2F-nfSw-HB
亚马逊主图第五张,安装步骤说明图。顶部蓝色通栏标题栏,白色大号衬线字体写着"Installation Steps"。画面为2x2四格圆角拼图,每格带蓝色圆形步骤编号和底部蓝色说明条:步骤1展示灰色带孔防滑垫背面,文字"Clean the back of the mat thoroughly";步骤2展示两只手揭开三角贴的白色离型纸,文字"Peel off the white release paper";步骤3展示两只手将黑色三角贴按压在地毯背面角落,文字"Press firmly onto the mat corner";步骤4展示揭开透明"on floor"保护膜后将地毯贴在地板上,文字"Peel off transparent film and press to floor"。背景统一为浅灰色长毛地毯纹理,产品为黑色三角形带蓝色on floor字样。整体蓝白配色,步骤清晰,商业摄影质感。保持产品外观与输入产品图一致。全英文无中文无商标。1:1正方形比例。负向提示:中文,商标,变形,文字错乱,产品模糊,水印,多余的手,手指畸形
GD207730565
亚马逊主图第五张,安装步骤说明图。顶部蓝色通栏标题栏,白色大号衬线字体写着"Installation Steps"。画面为2x2四格圆角拼图,每格带蓝色圆形步骤编号和底部蓝色说明条:步骤1展示灰色带孔防滑垫背面,文字"Clean the back of the mat thoroughly";步骤2展示两只手揭开三角贴的白色离型纸,文字"Peel off the white release paper";步骤3展示两只手将黑色三角贴按压在地毯背面角落,文字"Press firmly onto the mat corner";步骤4展示揭开透明"on floor"保护膜后将地毯贴在地板上,文字"Peel off transparent film and press to floor"。背景统一为浅灰色长毛地毯纹理,产品为黑色三角形带蓝色on floor字样。整体蓝白配色,步骤清晰,商业摄影质感。保持产品外观与输入产品图一致。全英文无中文无商标。1:1正方形比例。负向提示:中文,商标,变形,文字错乱,产品模糊,水印,多余的手,手指畸形
GD207730565
「图片1」「图片1」「图片1」「图片1」画面风格换成温馨淡绿色
GD899491528
效果不错
用户P15VBaii
[第4屏] Step-by-step usage demonstration for the cleaning set. [Atmosphere/Style] Step-by-step instruction style, clear flow, simple visuals. [Visual Layout] 3-step horizontal layout, each step includes a small action image and short description. Step 1: Attach sponge head to the handle. Step 2: Soak and wring out in the collapsible bucket. Step 3: Start cleaning your floor. Use product appearance from [image1] to ensure consistency. [Text Layout] Each step has numbered title "Step 1", "Step 2", "Step 3" and 1-line description, short and clear. [Color Scheme] Global background #f0f0f0, light gray background for each step card, orange step numbers. [Composition] Evenly distributed 3 steps, balanced white space, clear reading flow. [Resolution and Proportion] 1:1 square ratio, 4K resolution, clear readable text. [Negative Prompt] wrong product shape, wrong order, Chinese characters, text disorder, blurry product.
1qzip1d3v3jgUphw-HB
Strictly follow the installation step layout of the seventh reference image, for the white caterpillar suction cup shower holder. Main title "Installation Steps", four steps: 1. Remove shower hose, 2. Insert and tighten the shower holder, 3. Stick the shower firmly on the wall, 4. Installation complete. Keep the four-grid layout, show the installation process, all text in English, product is white as original, 800x800 size.
1qibmj3g7t9PyBRA-HB
参考原图布局和画面,将所有中文替换为英文翻译:大标题 Only 3 Steps, Easy to Get Started。步骤文字:01 Preparations,02 Start Application,03 Wait for Drying,Renovation Complete。Keep original design style, color scheme and composition unchanged。
江某某m
Installation instruction diagram, change all Chinese text to English: Installation Diagram, 1. Take out accessories, 2. Screw the expansion nut 3-5 turns, 3. Insert the expansion plug together with the mounting base into the mounting hole, 4. Adjust the screw position, 5. Install the toilet seat, 6. Adjust the position of the toilet seat, 7. Remove the toilet seat, 8. Tighten the screw, according to the expansion screw principle, tighten the plug as tightly as possible, 9. Cover the decorative cover, 10. Installation completed, Expansion fixing principle, stable and does not shift, Screws can be adjusted 360°, strong universality
69c827n6eUwk9Lg-HB
Installation instruction diagram, change all Chinese text to English: Installation Diagram, 1. Take out accessories, 2. Screw the expansion nut 3-5 turns, 3. Insert the expansion plug together with the mounting base into the mounting hole, 4. Adjust the screw position, 5. Install the toilet seat, 6. Adjust the position of the toilet seat, 7. Remove the toilet seat, 8. Tighten the screw, according to the expansion screw principle, tighten the plug as tightly as possible, 9. Cover the decorative cover, 10. Installation completed, Expansion fixing principle, stable and does not shift, Screws can be adjusted 360°, strong universality
69c827n6eUwk9Lg-HB
Installation instruction diagram, change all Chinese text to English: Installation Diagram, 1. Take out accessories, 2. Screw the expansion nut 3-5 turns, 3. Insert the expansion plug together with the mounting base into the mounting hole, 4. Adjust the screw position, 5. Install the toilet seat, 6. Adjust the position of the toilet seat, 7. Remove the toilet seat, 8. Tighten the screw, according to the expansion screw principle, tighten the plug as tightly as possible, 9. Cover the decorative cover, 10. Installation completed, Expansion fixing principle, stable and does not shift, Screws can be adjusted 360°, strong universality
69c827n6eUwk9Lg-HB
Installation instruction diagram, change all Chinese text to English: Installation Diagram, 1. Take out accessories, 2. Screw the expansion nut 3-5 turns, 3. Insert the expansion plug together with the mounting base into the mounting hole, 4. Adjust the screw position, 5. Install the toilet seat, 6. Adjust the position of the toilet seat, 7. Remove the toilet seat, 8. Tighten the screw, according to the expansion screw principle, tighten the plug as tightly as possible, 9. Cover the decorative cover, 10. Installation completed, Expansion fixing principle, stable and does not shift, Screws can be adjusted 360°, strong universality
69c827n6eUwk9Lg-HB
Step-by-step installation guide for the rod pocket pure black curtains, show the completed hang on curtain rod, a hand is putting the curtain onto the rod. The background is a clean bright room, simple clear demonstration of the easy hanging process. Top title "3 Simple Steps to Install", bottom three simple icons with text: 1. Slide onto Rod 2. Adjust Position 3. Done. All text in English, clear step-by-step layout, 1:1 square image, photorealistic
6ab9csi2xbQ-bCA-HB
Step-by-step installation guide for the rod pocket pure black curtains, show the completed hang on curtain rod, a hand is putting the curtain onto the rod. The background is a clean bright room, simple clear demonstration of the easy hanging process. Top title "3 Simple Steps to Install", bottom three simple icons with text: 1. Slide onto Rod 2. Adjust Position 3. Done. All text in English, clear step-by-step layout, 1:1 square image, photorealistic
6ab9csi2xbQ-bCA-HB
「图片1」「图片1」「图片1」「图片1」画面风格换成温馨淡绿色
GD899491528



![[第5张] 亚马逊详情页三种安装方式 - 安装步骤演示。本张使用【图2】【图3】【图4】作为安装步骤参考,提取三种安装方式:悬挂、猫眼、上墙。
[氛围/风格] 清晰教程风,步骤明确易读。
[元素布局] 画面分为上中下三栏,每栏对应一种安装方式:上栏悬挂安装(免打孔)- 4小步图示;中栏猫眼安装 - 4小步图示;下栏上墙安装 - 4小步图示;每栏左侧标题+步骤小图;背景浅灰背景,白色步骤图为白色卡片式布局。
[光影质感] 均匀明亮,步骤图清晰易读。
[配色色系] 全局底色 #F5F6F7;主色深灰;辅助色橙黄标题色标题色标题色条;白色步骤图白底。
[视角构图] 三栏纵向布局,每栏左标题+步骤小图横向排列。
[文字版式] 全英文。每栏大标题:"1. Hanging Installation (No Drilling)"、"2. Peephole Installation"、"3. Wall Mount Installation";每步配Step 1/2/3/4编号+简短说明文字;步骤图清晰展示手部操作动作。
[比例分辨率] 1:1方形,4K分辨率。
[负向提示词] 中文字符,文字错乱,步骤不清,水印,产品变形。](https://gd-cms.dancf.com/gd-cms/xi19e5/0/cd8ad686-d222-4cf0-9c02-a4132abba17e825.jpeg?x-oss-process=image/resize,w_640,type_6/sharpen,120/interlace,1)

![[商品] 使用【图1】灰色圆形硅胶防撞颗粒产品图;保留圆形扁平形状、灰色硅胶材质、背胶属性;步骤图中展示颗粒被手指捏持、粘贴的真实状态。
[画面] 页面目标:安装步骤演示,强调操作简单无需工具。构图:横向三步流程,顶部标题区,下方STEP 1-2-3横向排列。主体:每步配欧美成人手部动作特写——STEP1:用酒精棉片清洁柜门表面;STEP2:手指捏起一颗颗粒撕下离型纸;STEP3:手指将颗粒按压在柜门内侧边角。每步下方配简短说明。景别:手部动作中近景。阅读动线:顶部标题→从左到右三步流程。前中后景:背景渐变、中层三步场景图、前景步骤编号与文字。
[视觉] 套系策略:风格=跨境极简专业商业摄影;标题字=现代无衬线粗体(英文字体);正文字=简洁无衬线体;主色=深炭灰+中灰;背景延展=基于深炭灰到浅灰的竖向渐变,带细腻磨砂质感;强调色=亮青色(仅用于步骤数字圈、引线和重点标签);标题色=白色;正文色=浅灰;组件=亮青色圆形步骤编号、圆角步骤图边框、步骤说明文字卡;光影=每步场景内自然柔光,手部真实肤色质感。
[文字] 顶部主标题"Easy 3-Step Installation",副标题"No Tools Required";三步分别标注:"Step 1 - Clean & Dry Surface"、"Step 2 - Peel Off Backing"、"Step 3 - Press Firmly & Wait";全部横向排版。
[规格] 图片比例9:16竖版,4K,负向提示:避免变形、错字、文字过小、中文文字、亚洲手部/面孔、产品颜色改变、安装动作不真实、绝对化宣传语。](https://gd-cms.dancf.com/gd-cms/xi19e5/0/b06d4afa-a070-4b6e-85b4-5dbb0dbde5b342656.jpeg?x-oss-process=image/resize,w_640,type_6/sharpen,120/interlace,1)





![[垫图]:https://gdesign-dam-hz.dancf.com/35917502791928896/52f4ac459bb04828a8fb41bfde29a643.jpg 产品外观必须和原图保持100%一致,不得修改。主图主题: Easy Self-adhesive Installation, 氛围风格: Simple step-by-step tutorial style, bright and clean, 画面元素: Slice layout, three slice areas from top to bottom show the installation steps: 1. Clean the door gap 2. Peel off the backing paper 3. Paste and press, the product is completely displayed in the last slice area, the product itself is not cut, the overall picture is coherent. 配色色系: Light gray background, white product, dark text, simple and clear. 视角构图: Flat overhead view, clear steps. 文字版式: Each step is marked with number and title "1. CLEAN", "2. PEEL", "3. PRESS", the title is bold, the text is clear, the position does not block the product display. 分辨率: 2K](https://gd-cms.dancf.com/gd-cms/xi19e5/0/e32b38bb-3f8b-4a9f-b161-bad00e078e0e10646.png?x-oss-process=image/resize,w_640,type_6/sharpen,120/interlace,1)


![[第4屏] Step-by-step usage demonstration for the cleaning set. [Atmosphere/Style] Step-by-step instruction style, clear flow, simple visuals. [Visual Layout] 3-step horizontal layout, each step includes a small action image and short description. Step 1: Attach sponge head to the handle. Step 2: Soak and wring out in the collapsible bucket. Step 3: Start cleaning your floor. Use product appearance from [image1] to ensure consistency. [Text Layout] Each step has numbered title "Step 1", "Step 2", "Step 3" and 1-line description, short and clear. [Color Scheme] Global background #f0f0f0, light gray background for each step card, orange step numbers. [Composition] Evenly distributed 3 steps, balanced white space, clear reading flow. [Resolution and Proportion] 1:1 square ratio, 4K resolution, clear readable text. [Negative Prompt] wrong product shape, wrong order, Chinese characters, text disorder, blurry product.](https://gd-cms.dancf.com/gd-cms/xi19e5/0/c6ae036f-bfc9-4ed1-b465-6018b3a40aca40605.png?x-oss-process=image/resize,w_640,type_6/sharpen,120/interlace,1)