已添加
登录/注册
去掉图片里的所有红色箭头,其他元素、文字、图片内容都完全保留不变
去掉图片里的所有红色箭头,其他元素、文字、图片内容都完全保留不变
1qjinagm79J...
2026.03.06
做同款
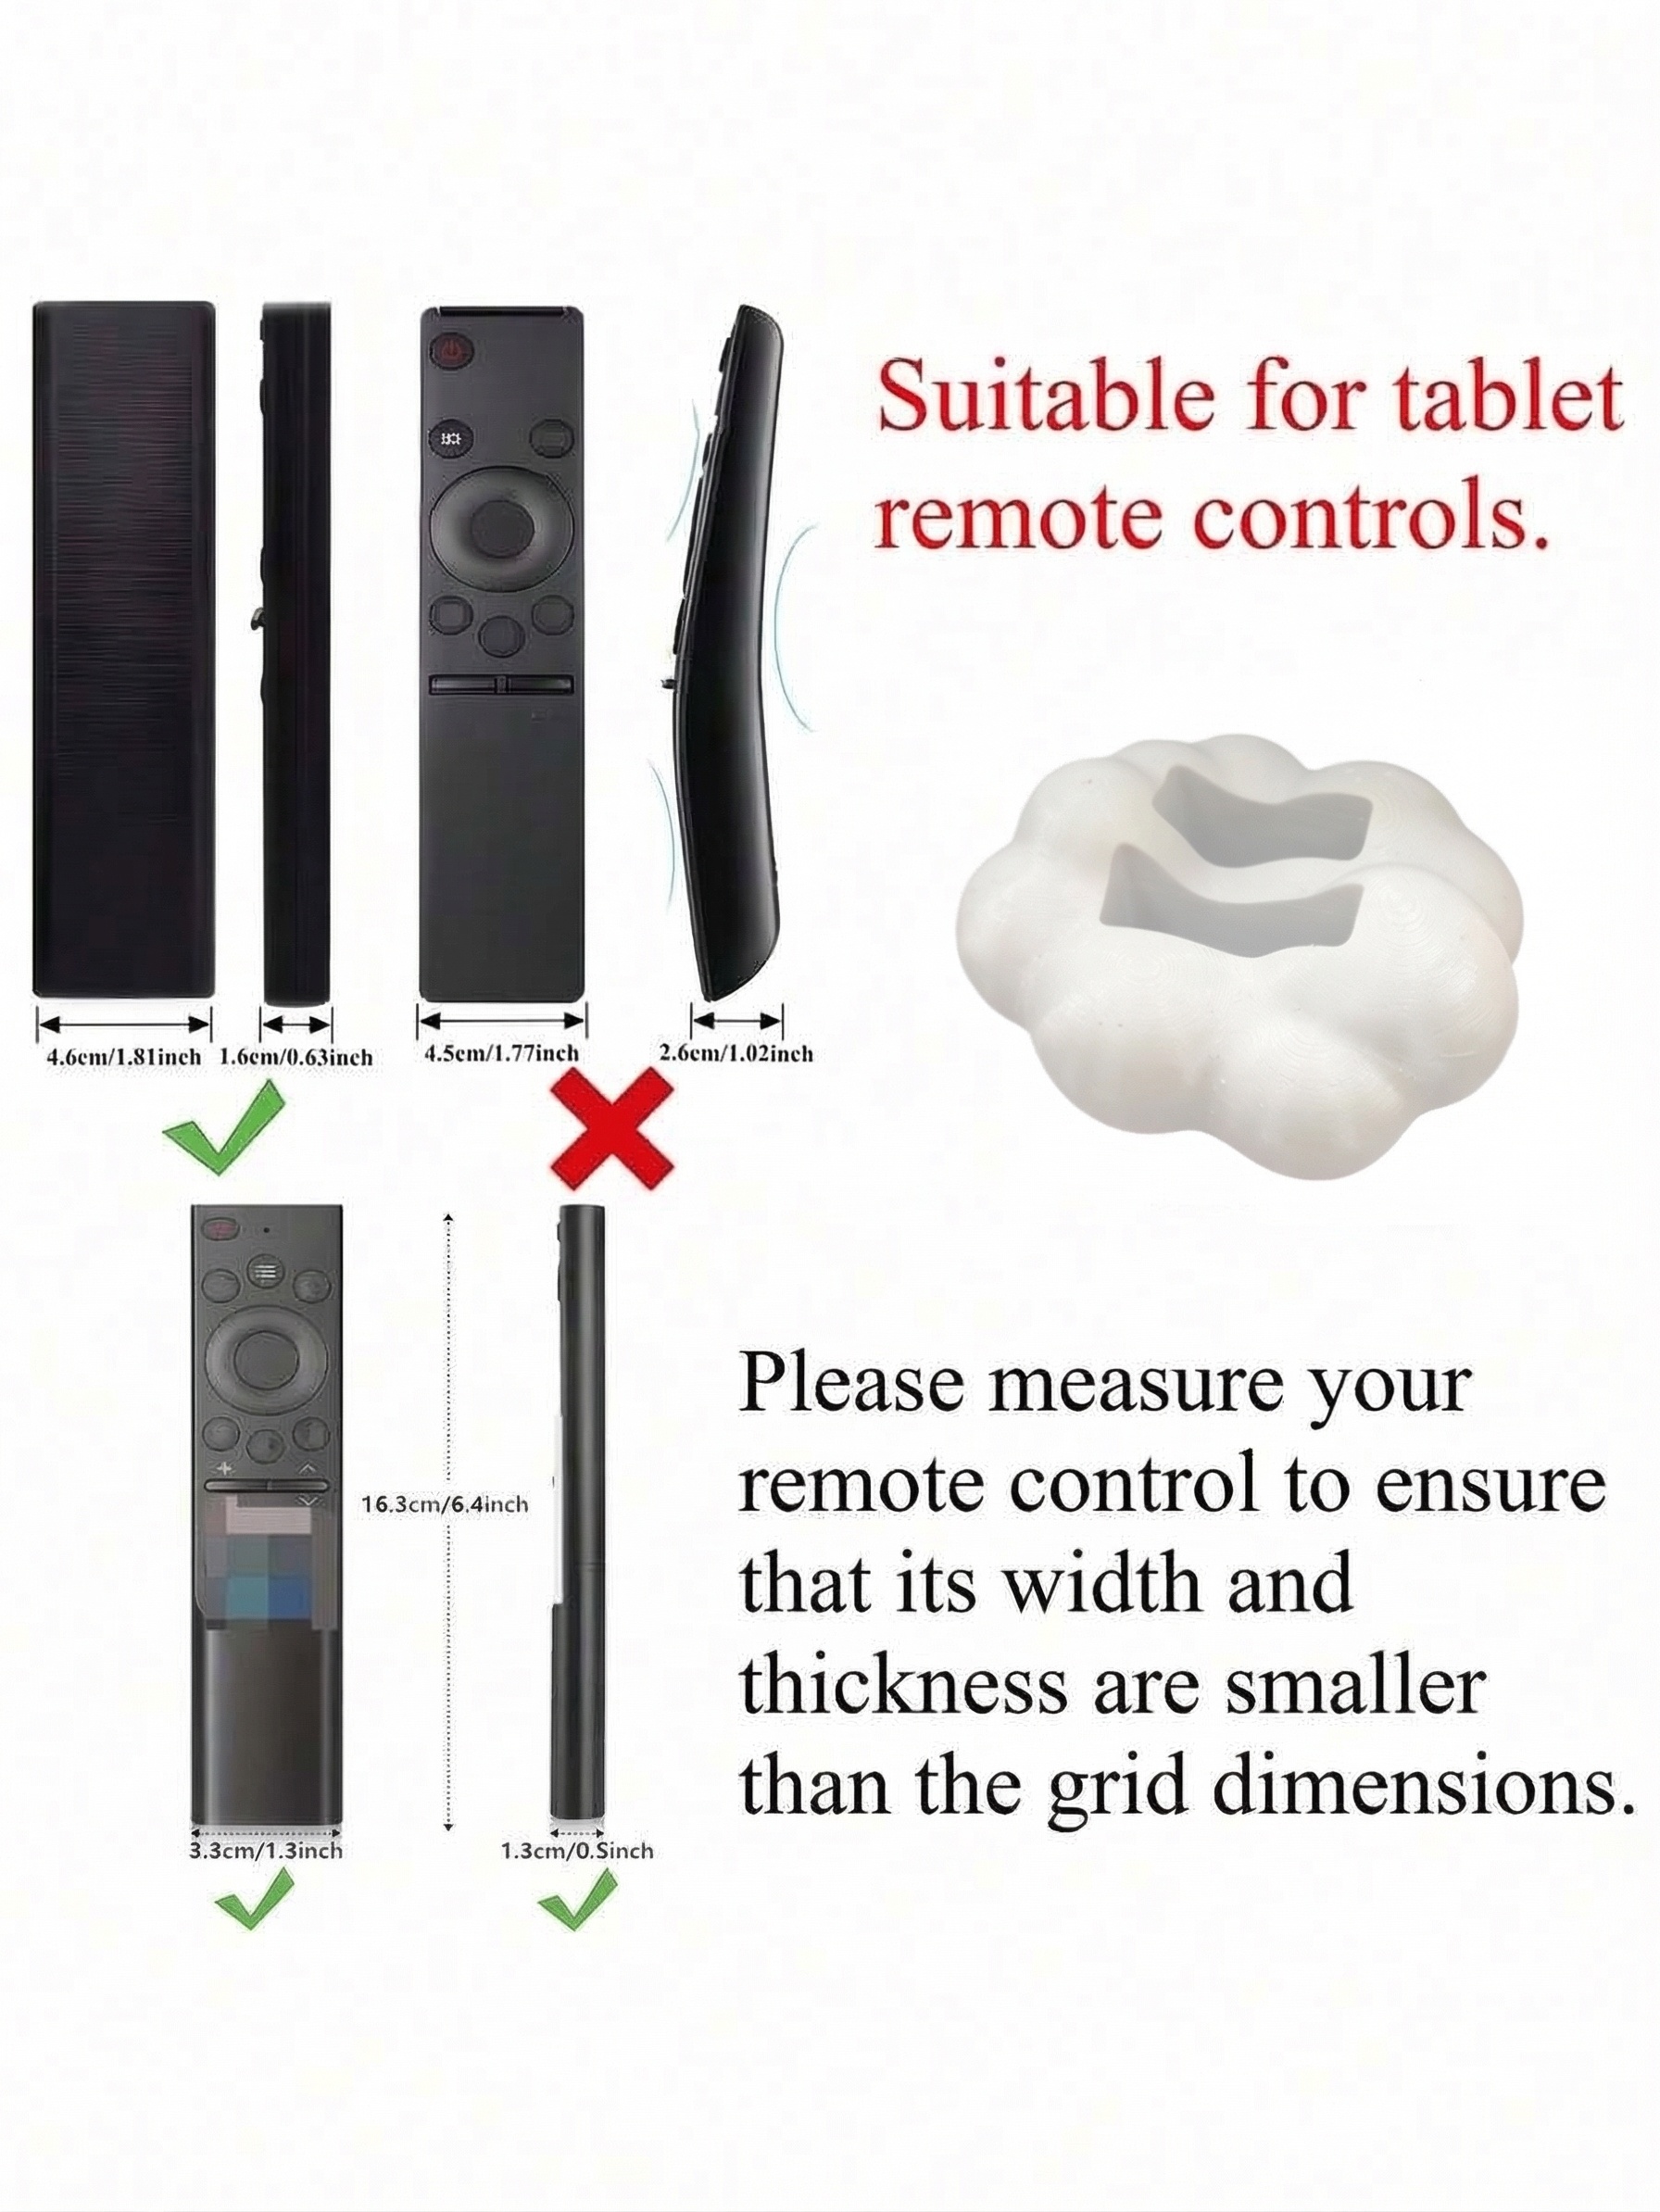
重新设计产品细节图,将图二的遥控器及保护套全部替换为图一的亮绿色索尼款遥控器保护套款式。画面中央展示两个保护套:左侧正面套在索尼遥控器上,右侧背面保护套,两者呈X形交叉摆放,与图一布局一致。四个圆形细节放大图分别位于四角,用引线连接到对应位置:左上角"Silicone Material"展示硅胶材质柔软质感,右上角"Infrared Window / Sensor Opening"展示顶部红外感应开孔,左下角"Lanyard / Strap Hole"展示挂绳孔及同色挂绳,右下角"Anti-slip Texture"展示背面防滑纹理。顶部大标题"Precise Cutouts"黑色粗体字。所有产品外观、颜色、按键布局与图一完全一致(亮绿色索尼款)。背景为纯白色,整体风格简洁专业,信息清晰易读。英文文案,无衬线字体,排版整齐。商业产品细节图风格,4K高清画质。
南絮83381
亚马逊遥控器保护套适配型号卖点图,重新设计整合两张图的适配信息。顶部大标题"Compatibility"紫色粗体字,副标题"Specially designed for Sony Bravia smart TV remote control"黑色小字,下方红色标注"NOT suitable for other brand remote controls"。画面采用左右分区布局:左侧为兼容型号区(绿色对勾标识),展示6款兼容的遥控器外观,下方标注对应型号:RMF-TX300U、RMF-TX310E、RMT-TX100D、RMT-TX100E、RMF-TX200P、RMF-TX200U、RMT-TX200A、RMT-TX300E等,每款遥控器下方有绿色对勾图标。右侧为不兼容型号区(红色叉号标识),展示4款不兼容的遥控器外观,下方标注型号:RMF-TX500E、RMF-TX600U、RMF-TX800U、RM-ED011等,每款遥控器下方有红色叉号图标。遥控器按实际尺寸比例排列,尺寸标注用"cm/inch"双单位。画面底部中央展示一个紫色硅胶遥控器保护套产品图,作为产品主体。背景为纯白色,整体风格简洁专业,信息清晰易读。英文文案,字体为无衬线体,排版整齐。商业信息图风格,高清画质。
南絮83381
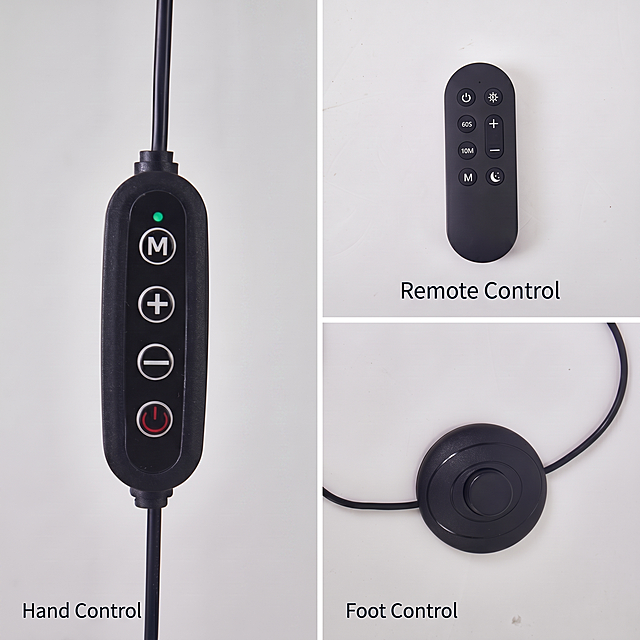
[Main Image 2] Multi-control method detail display of Half-moon curved LED floor lamp. [Atmosphere Style] Functional close-up display, professional commercial photography style, simple and clear. [Quality] Commercial photography texture, soft light, clear details, real picture, high definition. Keep product material and appearance consistent with the original image, fine processing. 1:1 square picture, full screen without border. [Elements] The picture is divided into three modules. The large module on the left shows the hand controller on the lamp body in close-up, the upper right small module shows the remote control details, and the lower right small module shows the foot switch controller. Each module clearly shows the appearance of different control methods, with English text labels: "Hand Control", "Remote Control", "Foot Control" respectively. Text is clearly placed in the blank space of each module without blocking the product. Keep all product details consistent with the original image. [Light and Shadow] Even soft studio light, clearly presents the button details and texture of each controller, the picture is transparent without gray. [Color Matching] Main color simple off-white background, auxiliary color controller matte black, button white text and indicator green highlight. [Perspective Composition] Flat close-up perspective, each module is clearly layered, the layout is reasonable, the focus is sharp. [Text Layout] English text labels are placed at the bottom left of each module, font is concise, dark text on light background, clear contrast, in line with cross-border platform requirements. [Proportion Resolution] 1:1 proportion, 2K resolution, super high definition. [Negative Prompt] Deformation, watermark, text clutter, blurred image, messy background, Chinese characters, excessive decoration.
1r1qf7aoi8t0s_gA-HB
Edit this image: remove the thick black light pole in the middle of the left area, extend the plain light gray background to fill the vacated position, keep the hand control panel remote control foot control and all text labels completely unchanged, keep the three-module layout of the original picture, keep the original picture style texture light and color consistent, ensure that the processed background is naturally connected with the surrounding, and there is no trace of editing. The picture is still 1:1 square, commercial photography style, clear picture, high-definition. Negative prompt: editing traces, deformation, blurred picture, inconsistent background, text disorder.
1r1qf7aoi8t0s_gA-HB
参考图二的规格图版式,用图一的橙色Roku遥控器硅胶保护套制作一张规格参数图。顶部蓝色横幅配白色大写粗体标题"SPECIFICATIONS"。主体展示遥控器保护套的正面和侧面两个视角,配有尺寸标注线:高度标注14cm / 5.51in,正面宽度4.5cm / 1.77in,侧面厚度2cm / 0.79in,同时标注厘米和英寸。底部蓝色边框区域标注"Package Included:",包含图标:Remote Cover x1(橙色保护套图标)和Colorful Strap x1(橙色挂绳图标)。纯白背景,亚马逊电商风格,排版整洁专业,产品高清锐利
南絮83381
[单张主图] 圆形LED发光手绘留言板套装配件组合。爆款主图路线,卖点为全套5件配件完整展示,适配亚马逊跨境平台。参考图采用俯拍平铺配件全览的版式,本次生成保持该陈列逻辑,背景改为纯白色。 [画面主体] 五件配件:亚克力圆板、可擦笔、USB线、发光底座、遥控器,都整齐陈列于画面中,保持每个产品外观(形状、颜色、材质)和输入产品图绝对一致,杜绝任何变形和色差,精细化处理每个配件细节。商品主体占画面85%以上,俯拍平铺视角,所有配件清晰展示,每个配件下方标注对应的英文名称和数量,文字清晰可读。 [构图版式] 采用包装清单宫格排列,顶部大标题,下方整齐陈列所有配件,每个配件标注名称,背景纯白色干净无干扰。 [场景元素] 纯白色干净背景,无多余道具,无干扰元素,仅展示五件产品配件。 [文案版式] 顶部居中大字 "PACKAGE INCLUDES",下方小字 "Complete Accessories Kit",每个配件下方标注对应英文名称和数量:"Acrylic panel x1", "Erasable pen x1", "USB cable x1", "Illuminated base x1", "Remote control x1"。全部使用英文,字体简洁无衬线,深色文字和白色背景强对比,清晰易读。 [光影质感] 干净明亮的棚内灯光,均匀布光,主光正面打光清晰展示产品轮廓,辅光柔化阴影,反光提亮产品质感,每个配件对焦清晰,高分辨率,8K商业产品摄影风格,画面干净通透,无噪点。 [配色字体] 主背景纯白色,文字深灰色,产品保持原有白色和彩色细节,字体采用无衬线粗体,层次清晰。 [比例分辨率] 1:1 比例,2k 分辨率,文字清晰可辨,超高清。 [负向提示词] 变形,水印,文字错乱,产品图模糊,背景杂乱,中文文字,中文标注,遮挡产品,色差,结构错误
吃饭坐小孩那桌°
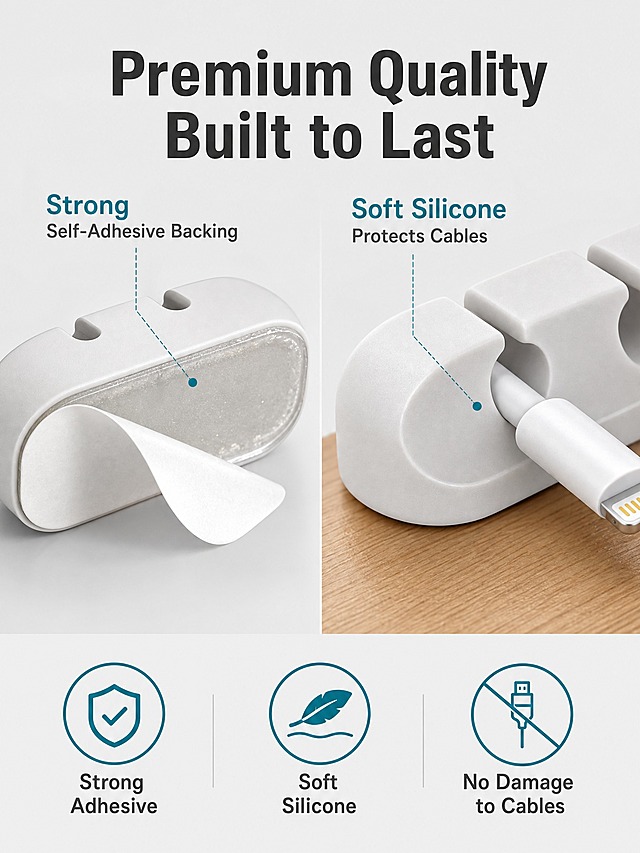
[主图-4] 7 Pack Cable Clips White Self-Adhesive Cord Organizer (1/2/3/4/5/6/7 Slots) 材质与安装细节图,展示自粘背胶和硅胶材质品质。 [统一基调] 亚马逊跨境信息图风格,浅灰色背景,标题用深灰色粗体无衬线字体,辅助文字用中灰色,强调色用清新蓝绿色,整体简洁克制。 [画面] 画面左侧为一个电缆夹的侧视特写,清晰展示底部的自粘背胶层,背胶纸掀起一角,露出透明强力胶层;右侧为电缆夹槽位的微距特写,展示柔软硅胶材质的光滑内壁和圆角设计,一根数据线轻轻卡入槽位中,体现不伤线的特点。背景为浅灰色,底部有一小块木质桌面作为语境参考。画面下方有3个小图标分别代表:Strong Adhesive、Soft Silicone、No Damage to Cables。 [光影质感] 微距摄影质感,侧逆光突出硅胶材质的柔软质感和背胶层的通透感,细节清晰,阴影柔和。 [配色] 浅灰背景,白色硅胶产品,透明背胶层,深灰标题,蓝绿色图标和强调色。 [文字版式] 顶部大号粗体标题"Premium Quality Built to Last",左侧特写旁标注"Strong Self-Adhesive Backing"小字,右侧特写旁标注"Soft Silicone Protects Cables"小字,底部3个图标下方各配一行说明文字。 [输出要求] 比例3:4,文字清晰可读,产品细节清晰,无变形、错字、模糊、杂乱、水印、平台Logo。
林晚11885
调整尺寸,调整为900*1200像素
YeloZtoY
去除右下角的水印文字,修复遥控器按键使其清晰完整,整体画面提升清晰度和画质,保持夜光效果和场景不变,高清输出
朝颜57297
Installation instruction diagram, change all Chinese text to English: Installation Diagram, 1. Take out accessories, 2. Screw the expansion nut 3-5 turns, 3. Insert the expansion plug together with the mounting base into the mounting hole, 4. Adjust the screw position, 5. Install the toilet seat, 6. Adjust the position of the toilet seat, 7. Remove the toilet seat, 8. Tighten the screw, according to the expansion screw principle, tighten the plug as tightly as possible, 9. Cover the decorative cover, 10. Installation completed, Expansion fixing principle, stable and does not shift, Screws can be adjusted 360°, strong universality
69c827n6eUwk9Lg-HB
1r4tg1v37t35w8bw-HB
参考图一,将图二的产品做一个产品介绍图,比图一的排版配色更好,背景更有科技感,大标题改为:Smart Presets,小标题:Effortlessly achieve Zero-Gravity, TV, or Sleep positions with one touch. Quickly set and save your own perfect custom position.此张图主要是介绍产品的中间的五个键位,其中ZG HOME TV SLEEP M ,其中这5个键位需要展示明显些,5个键位对应的配文:ZG - Activates Zero-Gravity mode to optimally align your spine, hips, and knees. Home - Returns the chair to the default seated position: backrest upright and legrest down. TV - Adjusts to an optimal upright viewing position with the leg rest raised. SLEEP - Reclines backrest and lifts leg rest into a restful position. M - Program memory positions or toggle lockout.
用户hcb0Pf6k
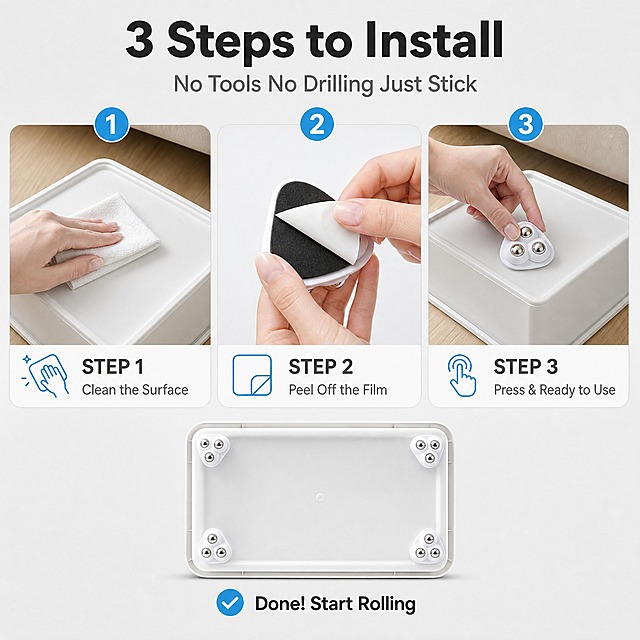
[商品] 使用三角款三钢珠粘贴式万向轮产品图;保留三角白色ABS底座、三颗亮面不锈钢滚珠、背胶粘贴面结构、产品颜色和比例;增强质感,不改变结构外观。 [画面] 页面目标:安装步骤演示,步骤演示型(三步)。画面横向分为三等分,三步从左到右排列:STEP 1 一只欧美女性的手(肤色白皙,指甲干净)正在清洁收纳箱底部表面,配清洁布示意;STEP 2 手正在撕开轮子背胶的白色离型纸,特写黑色泡棉胶面;STEP 3 手将轮子按压在收纳箱底部,安装完成状态。每步上方有圆形步骤编号(1/2/3),下方有简短英文说明。画面底部居中展示4颗轮子安装完成的收纳箱底部仰视小图作为完成效果。 [视觉] 套系策略:风格=TikTok Shop跨境极简年轻风,真实商业摄影质感;标题字=现代无衬线粗体(粗黑大号);正文字=简洁无衬线体(常规字重);主色=浅冷灰;背景延展=基于浅冷灰做深浅层级渐变、同色系卡片和细腻哑光质感;强调色=亮蓝色,仅用于小面积图标、引线和标签;标题色=深炭灰;正文色=中冷灰;组件=圆角浅灰信息卡、细线引线、简约线性图标;光影=柔和顶光+正面补光,每步画面光线均匀一致。 [文字] 顶部居中主标题"3 Steps to Install"(大号粗体),副标题"No Tools No Drilling Just Stick"(中号)。三步下方说明:STEP 1 "Clean the Surface",STEP 2 "Peel Off the Film",STEP 3 "Press & Ready to Use"。底部完成图下方标注"Done! Start Rolling"。所有文字横排,英文。 [规格] 图片比例1:1方图,2K分辨率,避免变形、错字、文字过小、中文、手指畸形、穿模、Best/No.1等极限词。
月白04454
「图片1」「图片1」「图片1」「图片1」「图片1」「图片1」参考这六张竞品图片模仿生成相似的亚马逊后台产品图片,相似度不能太高,图片比例1:1,不要出现中文跟商标,同样生成六张
GD207730565
将图片尺寸改为1:1比例,保留全部原有内容
69c827n6eUwk9Lg-HB
将这张汽车钥匙拆装说明书图片上的所有中文文字替换为英文,保持原有图片的布局、图片内容、排版结构完全不变,生成英文版本的安装说明书。具体文字翻译如下: 标题'拆装方法演示'翻译为'Disassembly and Assembly Instructions' 副标题'还有更详情细拆装视频请联系客'翻译为'For more detailed disassembly video, please contact customer service' 1. '用螺丝刀撬开外壳'翻译为'Pry open the shell with a screwdriver' 2. '取出螺丝'翻译为'Remove the screw' 3. '掰开原车外壳'翻译为'Pry apart the original key shell' 4. '取出主板'翻译为'Remove the circuit board' 5. '取出芯片'翻译为'Remove the chip' 6. '取出主板和芯片'翻译为'Remove the circuit board and chip' 7. '掰开新外壳'翻译为'Pry apart the new shell' 8. '把主板卡好在内胆壳上'翻译为'Secure the circuit board onto the inner shell' 9. '安装好电池(有麻点的一面向下)'翻译为'Install the battery (textured side facing down)' 10. '安装好内胆'翻译为'Install the inner shell' 11. '安装好芯片'翻译为'Install the chip' 12. '盖好后盖安装完成'翻译为'Close the back cover, installation complete' 所有图片内容、步骤顺序、整体版式、背景颜色都保持原样,只替换文字为英文。
GD567797976
优化重绘这张安装步骤图,保留原有四步安装流程和对应文字说明,优化画面清晰度和质感,提升整体排版美观度,文字"Installation Steps"保留,让步骤展示更清晰高级
GD899491528
「图片1」「图片1」「图片1」「图片1」「图片1」「图片1」「图片1」「图片1」「图片1」「图片1」把上面有汕头的水印都去掉
GD398272899
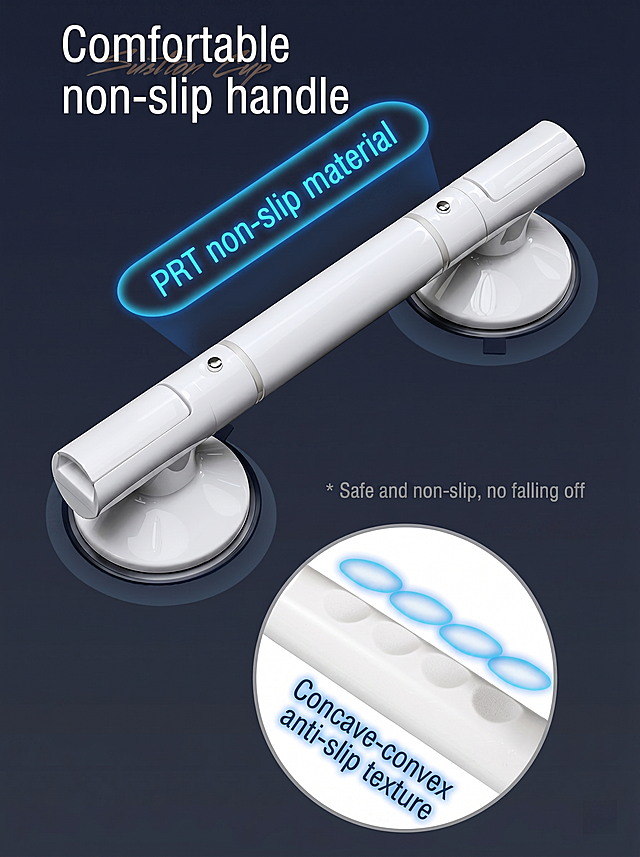
基于原图,将所有中文替换为英文:左上角改为'Comfortable non-slip handle',发光条改为'PRT non-slip material',右下角小字改为'* Safe and non-slip, no falling off',圆形区域改为'Concave-convex anti-slip texture',整体构图和风格保持不变,调整输出图片尺寸为900*1200像素
YeloZtoY
[主图-5] 尺寸规格图 护膝与控制器尺寸标注 厘米和英寸双单位 [统一基调] 跨境亚马逊信息图风格 纯白色背景 英文文案 黑色粗体无衬线标题字 深灰色辅助文字 红色尺寸标注线 简洁清晰的视觉调性 [画面] 画面上方展示平铺展开的护膝正面视图 带有完整的尺寸标注线 标注总长度 总宽度 开孔直径等关键尺寸 画面右上角展示圆形控制器的尺寸 标注直径和厚度 画面下方展示护膝内侧视图 同样带有尺寸标注 所有尺寸线为红色细线 两端有箭头 尺寸数值同时标注厘米和英寸 例如 53.5cm / 21.1inch 布局清晰 标注不挤压产品主体 [光影质感] 专业产品摄影质感 顶光均匀照射 产品平整无褶皱 边缘清晰 底部有极淡的阴影 面料纹理清晰可见 [配色] 纯白背景 黑色产品 红色尺寸标注线 黑色尺寸数字 深灰说明文字 [文字版式] 主标题在画面顶部居中 Knee Massager Size 尺寸数字标注在尺寸线旁边 大号清晰 单位用小号字体 全部为英文和数字 禁止中文 尺寸标注布局合理 不重叠 不遮挡产品关键结构 [输出要求] 1:1正方形比例 2048x2048像素 尺寸数字清晰可读 产品清晰 禁止变形 禁止错字 禁止杂乱 禁止水印 全部文字为英文 禁止中文 尺寸必须同时标注厘米cm和英寸inch两种单位
1q4g8s6mbc2ngquph-HB
生成一套亚马逊平台的电商套图,比例为1:1
Soint