已添加
登录/注册
生成亚马逊信息图
生成亚马逊信息图
不懂排版的设计师
2026.05.08
做同款
[Detail Page 5] How to Install - Step by Step Installation Demonstration. Atmosphere style: Clear instructional style, light gray background. Element layout: Three step demonstration arranged vertically. Step 1: Prepare connection pipeline and regulator, Step 2: Connect and tighten the thread, Step 3: Adjust pressure knob and test. Each step has a small operation photo and text description, product maintains original appearance in each step. Lighting: Uniform lighting for each step, clear visibility. Color scheme: Global background #f0f2f5, step numbers blue matching product, text dark gray. Perspective composition: Vertical three-step layout, clear reading flow. Text layout: Top main title "Simple Installation Steps", each step has step number, title and short description, all in English. Proportion resolution: 4:3 ratio, width 2048, height 1536, 4K resolution. Negative prompt: deformation, watermark, text distortion, wrong product, blurry image, cluttered background.
68ahxu0jkforabi-HB
[Detail Page 5] How to Install - Step by Step Installation Demonstration. Atmosphere style: Clear instructional style, light gray background. Element layout: Three step demonstration arranged vertically. Step 1: Prepare connection pipeline and regulator, Step 2: Connect and tighten the thread, Step 3: Adjust pressure knob and test. Each step has a small operation photo and text description, product maintains original appearance in each step. Lighting: Uniform lighting for each step, clear visibility. Color scheme: Global background #f0f2f5, step numbers blue matching product, text dark gray. Perspective composition: Vertical three-step layout, clear reading flow. Text layout: Top main title "Simple Installation Steps", each step has step number, title and short description, all in English. Proportion resolution: 4:3 ratio, width 2048, height 1536, 4K resolution. Negative prompt: deformation, watermark, text distortion, wrong product, blurry image, cluttered background.
68ahxu0jkforabi-HB
[Main image 10] Easy connection and installation demonstration. [Atmosphere style] Step-by-step demonstration style, clear guidance. [Image quality] Commercial photography texture, soft and transparent light, clear and real product, clean and advanced picture. [Elements] Three small pictures combined layout: left picture hand docking hose and connector, middle picture tighten the nut, right picture after the completion of water connection. Our irrigation hose in each step maintains the original color and material. Light gray background overall, three pictures equally divided, clear steps. [Light and shadow] Even soft studio light, each step picture has clear light, no dead angle. [Color matching] Light gray background, product color prominent, clean and clear. [Perspective composition] Horizontal three-grid layout, each step clear, prominent installation convenience. [Text layout] Top title "Easy Installation & Connection", below each small picture marked step 1 / step 2 / step 3 in English, all text clear, simple and easy to understand. [Output requirements] 1:1 ratio, clear text, ultra HD commercial photography texture. [Negative prompt] Deformation, text confusion, blurred product picture, messy background, watermark, e-commerce platform Logo, Chinese text.
· 囍樂 🌿
[Main image 10] Easy connection and installation demonstration. [Atmosphere style] Step-by-step demonstration style, clear guidance. [Image quality] Commercial photography texture, soft and transparent light, clear and real product, clean and advanced picture. [Elements] Three small pictures combined layout: left picture hand docking hose and connector, middle picture tighten the nut, right picture after the completion of water connection. Our irrigation hose in each step maintains the original color and material. Light gray background overall, three pictures equally divided, clear steps. [Light and shadow] Even soft studio light, each step picture has clear light, no dead angle. [Color matching] Light gray background, product color prominent, clean and clear. [Perspective composition] Horizontal three-grid layout, each step clear, prominent installation convenience. [Text layout] Top title "Easy Installation & Connection", below each small picture marked step 1 / step 2 / step 3 in English, all text clear, simple and easy to understand. [Output requirements] 1:1 ratio, clear text, ultra HD commercial photography texture. [Negative prompt] Deformation, text confusion, blurred product picture, messy background, watermark, e-commerce platform Logo, Chinese text.
· 囍樂 🌿
[主图-7] 安装步骤图 三步安装流程说明。 [统一基调] 跨境电商高级感 浅灰渐变背景 橙色步骤编号 深灰标题 无衬线字体 三步横排布局。 [画面] 顶部大标题3-Step Easy Installation 副标题Secure Mount No Tools Needed 下方横向分为三等分 三个步骤从左到右排列:Step 1 橙色圆形数字1 标题Insert Through Sink Hole 配图为皂液器从台面上方插入预留孔的截面示意图 橙色向下箭头指示方向 Step 2 橙色圆形数字2 标题Lock & Tighten 配图为从台面下方装入垫圈并顺时针拧紧螺母的示意图 橙色旋转箭头 Step 3 橙色圆形数字3 标题Attach 500ml Bottle 配图为对准底部螺纹顺时针旋紧瓶身的示意图 右下角有一个安装完成的小预览图带对勾标记 底部有提示文字Check All Connections Are Secure After Installation。 [光影质感] 产品示意图干净清晰 台面截面有真实石材纹理 橙色箭头醒目 整体专业易读。 [配色] 浅灰背景 橙色步骤编号和箭头 深灰标题 枪灰色产品 白色台面截面。 [文字版式] 顶部标题居中 三步横排等宽 每步上方圆形数字+标题 下方配图 文字全部英文 清晰可读。 [输出要求] 1:1比例 2048x2048 步骤清晰 图示准确 文字锐利 无变形 无错字 无水印 无中文。
1q4g8s6mbc2ngquph-HB
Strictly follow the installation step layout of the seventh reference image, for the white caterpillar suction cup shower holder. Main title "Installation Steps", four steps: 1. Remove shower hose, 2. Insert and tighten the shower holder, 3. Stick the shower firmly on the wall, 4. Installation complete. Keep the four-grid layout, show the installation process, all text in English, product is white as original, 800x800 size.
1qibmj3g7t9PyBRA-HB
「图片1」,生成一套详情页,商品名称为xxx,适配亚马逊平台,单图比例为9:16,需求屏数为5张。马来文
GD550392596
[Installation Steps] PVC Flat Hose 3-step Installation Instruction. 1:1 square ratio for Alibaba International. Keep the original step-by-step operation diagram, maintain product structure, color, and steps unchanged. Replace all Chinese text with natural English. Main Title at the top: "Easy Installation in Three Steps". Step 1 Title: "Step 1: Connect the Fitting", Description: "Align the hose with the connector and insert it firmly". Step 2 Title: "Step 2: Tighten the Lock", Description: "Rotate the clasp clockwise to ensure a leak-proof seal". Step 3 Title: "Step 3: Finish Connection", Description: "Check connection is secure, then ready for water use". [Style] Minimalist professional cross-border e-commerce style, clean layout, business photography texture. All text in English, no Chinese characters. [Layout] Keep the three-row vertical layout, each step has operation image on the left and text description on the right. Product accounts for 60% of the space, text area for 40%. All product details and arrow indications are preserved. [Lighting] Soft uniform lighting, clear product outline, natural shadow, high definition. [Color] Global background light beige #F5F0E6, main color green hose, auxiliary color dark green text box, black text. Keep color harmony. [Resolution] 1:1 square ratio, 4K resolution, all text clear and readable, high definition quality. [Negative prompt] Chinese characters, text garbled, text too small, distorted product, wrong color, watermark, blurry picture
创意 × 1
GD222888464
将这张马桶盖板安装步骤图的所有中文文字替换为英文,保持产品外观、结构、材质、颜色、构图、视角、光影和背景完全不变。所有文字内容翻译如下:顶部大标题"一键安装 无需工具"改为"One-Click Installation No Tools Required",副标题"女生也能轻松装"改为"Easy to Install Even for Beginners"。三步说明从左到右:第一步"01 对准孔位 快速定位"改为"01 Align Holes Quick Positioning",第二步"02 一键卡扣 按压固定"改为"02 One-Click Snap Press to Secure",第三步"03 安装完成 即可使用"改为"03 Installation Done Ready to Use"。所有文字保持原有位置、字体风格、字号层级和颜色,英文排版整齐清晰可读,不遮挡产品主体。画面禁止出现任何中文,产品主体白色马桶盖板、手指、安装步骤示意、橙色箭头和圆形编号等所有视觉元素与原图完全一致,商业摄影质感,超高清。
69c827n6eUwk9Lg-HB
「图片1」把这六张图拆开分别生成6张1:1正方形主图,可以优化升级一下
GD899491528
[主图-8] 包装清单与安装配件图,任务是展示全套产品配件,让买家清楚收到的所有物品与安装便利性。 [统一基调] 跨境电商高级厨卫风,干净整洁,开箱质感;主背景为浅灰色渐变台面,标题字为深炭灰色,辅助字为中灰色,强调色为深绿色(代表省心/全套),字体为无衬线英文,布局为Knolling平铺风格。 [画面] 采用俯视平铺(Knolling)构图,所有配件整齐排列在浅灰色台面上:中央上方是皂液器主体(镀铬+黑色磨砂),下方从左到右依次排列:金属锁紧螺母、橡胶垫圈、透明皂液瓶、延长软管、安装说明书(简化为白色小册子)、螺丝包小袋。物品之间间距均匀,排列整齐有序,有轻微自然阴影。画面左上角为标题区,右下角有一个圆形小插图,展示一只手正在轻松拧紧螺母的安装动作小场景。 [光影质感] 俯视棚拍质感,柔和均匀顶光,每个配件都有清晰的轮廓和质感,金属件反光细腻,透明瓶通透,整体干净整洁有品质感。 [配色] 浅灰背景台面,产品本身银黑配色为主,配件多为金属银+透明+白色,强调色深绿色用于标题高亮,整体统一干净。 [文字版式] 左上角大标题"Everything You Need",副标题"Easy Installation in Minutes";每个配件下方用细线引出标注名称:"Soap Dispenser Pump" "Brass Threaded Tube" "Lock Nut" "Rubber Gasket" "Soap Bottle" "Extension Tube" "Installation Manual";右下角小图旁标注"Quick & Easy Install"。底部横排3个绿色对勾卖点:"All Parts Included" "No Special Tools Needed" "Step-by-Step Guide"。所有文字为英文,无衬线字体,标签清晰。 [输出要求] 1:1正方形,2048x2048,配件排列整齐清晰,文字标注准确可读,无变形、无错字、无模糊、无水印、无平台Logo。
1q4g8s6mbc2ngquph-HB
[主图-3] 黄铜材质与止水阀工艺细节图,黑色喷枪阀体材质对比证明,全新版式。 [氛围风格] 亚马逊跨境专业信息图,材质工艺对比展示,高级精密感,冷调工业质感。 [画质] 超高清商业微距摄影质感,金属纹理清晰,黄铜截面色泽真实,表面工艺细腻,文字锐利。 [元素] 画面采用左右对比布局:左侧为普通劣质薄款喷枪的剖面示意(管壁薄、材质灰暗),标注为"Ordinary Sprayer";右侧为本品加厚黄铜阀体的真实剖切特写,金色黄铜内壁厚实均匀,黑色哑光外层工艺精细,标注为"Our Sprayer"。中间用VS分隔,突出对比。画面上方为完整的黑色喷枪与止水阀阀体组合外观,止水阀旋钮特写清晰。背景为冷灰色渐变,高级有质感。左下角小窗展示盐雾测试耐腐蚀示意,右下角小窗展示高压防爆测试示意。保持产品外观结构与输入产品图一致,杜绝变形色差。 [光影] 侧光突出金属纹理与黄铜截面质感,明暗对比强烈,边缘光勾勒产品轮廓,精密工业感。 [配色] 主色哑光黑+黄铜金色,背景冷灰,对比色红色VS标识,文字白色。 [视角构图] 上部完整产品,下部左右对比布局,底部两小测试图标,层次丰富对比强烈。 [文字版式] 顶部主标题大号粗体英文"Premium Brass Built to Last"。左右对比区分别标注"Thin Zinc Alloy"与"Thickened Solid Brass",中间"VS"字样醒目。底部测试图标标注"Corrosion Resistant"与"High Pressure Proof"。全部英文,清晰可读。 [输出要求] 1:1比例,2048px*2048px,文字清晰,超高清微距商业摄影质感。 [负向提示词] 变形,文字错乱,产品模糊,背景杂乱,水印,中文。
1q4g8s6mbc2ngquph-HB
使用爆款主图复刻技能生成8张比例1:1的电商主图,适配平台为亚马逊/跨境,商品为「图片1」「图片1」「图片1」「图片1」「图片1」「图片1」「图片1」,参考图为,商品卖点为 ,尺寸图中的毫米变成厘米和英寸
1q4g8s6mbc2ngquph-HB
[Main Image 6] Problem comparison diagram of kitchen sink strainer. Light gray background. Left column ordinary product: shows the problem of easy blockage, rust deformation, poor sealing. Right column our product: shows the advantages of smooth filtration, stainless steel anti-rust, good sealing water stop. Each comparison point is labeled with a short English description. Keep our product appearance completely consistent with input image. Clear contrast, highlight product advantages. No trademarks, no Chinese characters. 1:1 square composition, 2K resolution. Negative prompt: deformation, text confusion, blurred product image, messy background, watermark, trademarks, Chinese characters.
GD207730565
[第7屏] 安装步骤 - 六步安装流程图文说明。本屏使用【图8】作为商品主体。 [氛围/风格] 跨境电商教程说明风,深蓝星空渐变背景,步骤卡片清晰排列,专业易懂,商业摄影质感。 [元素布局] 2列3行共6个步骤卡片排列,每个卡片含操作特写图 + 步骤编号 + 英文说明:步骤1底座放入安装孔、步骤2螺丝半紧调孔距、步骤3盖板孔对准卡入、步骤4调节盖板位置、步骤5按下按钮取出、步骤6拧紧螺丝重新卡入;产品部件、工具、操作动作与输入图一致。 [光影质感] 均匀柔光,每个步骤图清晰明亮,卡片有轻微阴影浮起感。 [配色色系] 全局底色 #1A2744 深蓝星空渐变;主色白色步骤卡片 + 白色产品;辅助色 #FFD700 金色步骤编号 + 白色文字。 [视角构图] 网格布局2×3,阅读动线顶部标题 → 从左到右从上到下依次阅读步骤。 [文字版式] 顶部居中大标题 "One-Click Base Installation",白色粗体无衬线字体;每个步骤卡片左上角圆形金色编号 "1"-"6",下方英文步骤说明:1. Place base into toilet mounting holes 2. Half-tighten screws to adjust hole spacing 3. Align and click toilet seat into place 4. Adjust seat to proper position 5. Press button to release 6. Tighten screws and reattach;文字清晰可读。 [比例分辨率] 9:16 竖版比例,4K 分辨率,文字清晰可辨,高清画质。 [负向提示词] 产品变形,缺件错件,结构错误,颜色偏差,中文字符,水印,文字错乱,文字过小,产品图模糊。
69c827n6eUwk9Lg-HB
Installation instruction diagram, change all Chinese text to English: Installation Diagram, 1. Take out accessories, 2. Screw the expansion nut 3-5 turns, 3. Insert the expansion plug together with the mounting base into the mounting hole, 4. Adjust the screw position, 5. Install the toilet seat, 6. Adjust the position of the toilet seat, 7. Remove the toilet seat, 8. Tighten the screw, according to the expansion screw principle, tighten the plug as tightly as possible, 9. Cover the decorative cover, 10. Installation completed, Expansion fixing principle, stable and does not shift, Screws can be adjusted 360°, strong universality
69c827n6eUwk9Lg-HB
Installation instruction diagram, change all Chinese text to English: Installation Diagram, 1. Take out accessories, 2. Screw the expansion nut 3-5 turns, 3. Insert the expansion plug together with the mounting base into the mounting hole, 4. Adjust the screw position, 5. Install the toilet seat, 6. Adjust the position of the toilet seat, 7. Remove the toilet seat, 8. Tighten the screw, according to the expansion screw principle, tighten the plug as tightly as possible, 9. Cover the decorative cover, 10. Installation completed, Expansion fixing principle, stable and does not shift, Screws can be adjusted 360°, strong universality
69c827n6eUwk9Lg-HB
Installation instruction diagram, change all Chinese text to English: Installation Diagram, 1. Take out accessories, 2. Screw the expansion nut 3-5 turns, 3. Insert the expansion plug together with the mounting base into the mounting hole, 4. Adjust the screw position, 5. Install the toilet seat, 6. Adjust the position of the toilet seat, 7. Remove the toilet seat, 8. Tighten the screw, according to the expansion screw principle, tighten the plug as tightly as possible, 9. Cover the decorative cover, 10. Installation completed, Expansion fixing principle, stable and does not shift, Screws can be adjusted 360°, strong universality
69c827n6eUwk9Lg-HB
Installation instruction diagram, change all Chinese text to English: Installation Diagram, 1. Take out accessories, 2. Screw the expansion nut 3-5 turns, 3. Insert the expansion plug together with the mounting base into the mounting hole, 4. Adjust the screw position, 5. Install the toilet seat, 6. Adjust the position of the toilet seat, 7. Remove the toilet seat, 8. Tighten the screw, according to the expansion screw principle, tighten the plug as tightly as possible, 9. Cover the decorative cover, 10. Installation completed, Expansion fixing principle, stable and does not shift, Screws can be adjusted 360°, strong universality
69c827n6eUwk9Lg-HB
使用爆款主图复刻技能生成8张比例1:1的电商主图,适配平台为亚马逊/跨境,商品为「图片1」「图片1」「图片1」「图片1」「图片1」,参考图为,商品卖点为 ,
1q4g8s6mbc2ngquph-HB
[主图-7] 配件全家福与包装内容图,展示皂液器全套配件,让买家清楚了解购买所得。 [统一基调] 跨境电商高级厨卫风,浅灰白色背景,英文标题,无衬线字体,Knolling平铺陈列风格。 [画面] 画面采用俯视平铺(Knolling)方式,整齐排列皂液器全套配件:上方中央是皂液器主体(泵头+瓶身组合),左下方是盘绕成圆形的透明延长管带金属重锤,延长管中间区域摆放三个黑色固定卡扣、一个黑色螺纹塞、一个蓝色硅胶瓶塞。各配件之间间距均匀,排列有序,有轻微投影。左上角有标题,底部有一行总结文字。 [光影质感] 棚拍俯视角度,光线均匀柔和,每件物品底部有自然浅灰色投影,金属件有细腻高光,塑料和硅胶件质感真实。 [配色] 浅灰白色背景,主体拉丝金,透明管+黑色配件+蓝色硅胶塞形成色彩层次,标题深灰色。 [文字版式] 左上角大标题"Complete Package All You Need",粗体无衬线深灰色大字;底部中央一行小字"1x Soap Dispenser Pump 1x Bottle 1x Extension Tube Mounting Hardware Included",小号无衬线字体。各配件旁有极小号名称标注:"Pump Head"、"500ml Bottle"、"Extension Tube"、"Mounting Clips"、"Threaded Plug"、"Silicone Stopper"。 [输出要求] 1:1正方形,2048x2048,配件排列整齐清晰,质感真实,英文清晰。负向:中文、杂乱堆放、配件缺失、变形、模糊、水印、厚重边框。
1q4g8s6mbc2ngquph-HB
亚马逊跨境电商主图第四屏,主题为PVC硬塑料材质与卡扣锁紧防漏气密设计展示。画面风格专业工业风,突出材质强度和密封性能。 【画面布局】 顶部主标题:大号粗体深蓝色英文 "Built to Last Leak-Proof",副标题稍小 "Hard PVC Construction with Snap-Lock Seal"。 画面左侧为产品主体特写:黑色气阀转接头与白色电动充气泵气嘴紧密连接的侧视特写,聚焦于卡扣锁紧部位,能清晰看到接头的硬质PVC材质纹理、卡扣结构和紧密贴合的接缝。产品外观、结构、颜色与输入产品图完全一致,黑色工程塑料哑光质感真实。 画面右侧为3组竖向排列的卖点说明卡片,每组为深蓝底圆角矩形,白色图标+白色文字: - 卡片1(上):水压波纹图标 + 大字 "High Pressure Resistant" + 小字 "Withstands Strong Air Pressure" - 卡片2(中):拉力测试图标 + 大字 "Tear-Resistant PVC" + 小字 "Durable Hard Plastic Build" - 卡片3(下):密封垫圈图标 + 大字 "Airtight Snap Lock" + 小字 "No Leakage Faster Inflation" 画面底部区域:左右对比展示,左侧为廉价软胶接头变形漏气的示意图(灰色半透明,标注 "Cheap Soft Rubber Deforms & Leaks"),右侧为本产品硬质PVC接头紧密贴合的特写(标注 "Our Hard PVC Secure & Tight"),中间用VS标识分隔,突出材质差异优势。 【视觉细节】 - 卡扣连接部位用蓝色环形高亮圈标注,强调紧密贴合 - 接头表面有细微的材质纹理高光,体现硬质PVC的坚固感 - 背景为浅灰蓝色渐变,带细微工业网格纹理,增强科技专业感 - 所有英文文案清晰可读,字体为现代无衬线粗体 - 整体配色:深蓝主色 + 黑色产品 + 白色文字 + 蓝色高亮 1:1正方形比例,2K超高清,商业摄影质感,全英文文案。
满腹谜题的毛虫
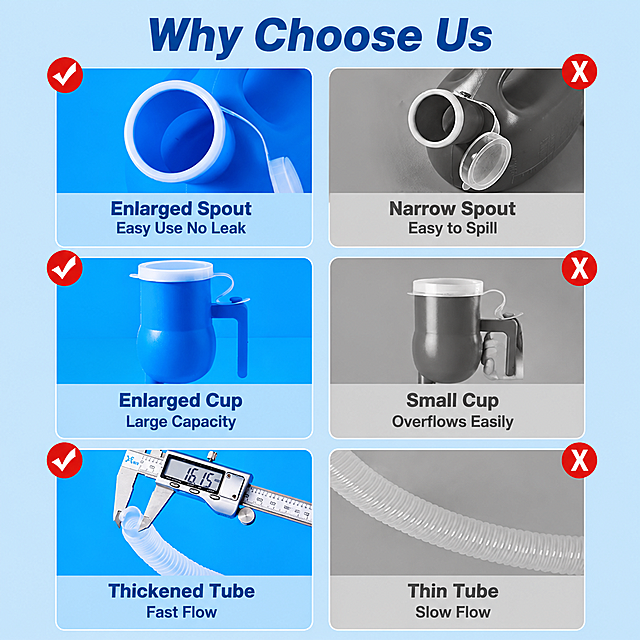
Amazon infographic main image 4, before and after comparison of 6 upgraded features. Light blue background, split comparison layout with 3 rows, each row has left side (our product with red checkmark) and right side (competitor grayed out with red X mark). Row 1 top: left shows close-up of enlarged urinal spout opening with white rim, text below "Enlarged Spout Easy Use No Leak"; right shows gray narrow spout, text "Narrow Spout Easy to Spill". Row 2 middle: left shows blue male adapter cup with handle, text "Enlarged Cup Large Capacity"; right shows gray small cup, text "Small Cup Overflows Easily". Row 3 bottom: left shows caliper measuring thick tube diameter (16.15mm), text "Thickened Tube Fast Flow"; right shows thin gray tube, text "Thin Tube Slow Flow". Each comparison pair has red checkmark on top-left of good side, red X on top-right of bad side. Keep all blue product parts consistent with input image in shape, color, material. Top title: "Why Choose Us", bold dark blue. Professional comparison infographic style, clean and clear. Color palette: blue main color, white cards, red check/X accents. 1:1 ratio, all English text clear, ultra high definition. Negative: Chinese text, deformed, blurry, watermark
1q4g8s6mbc2ngquph-HB
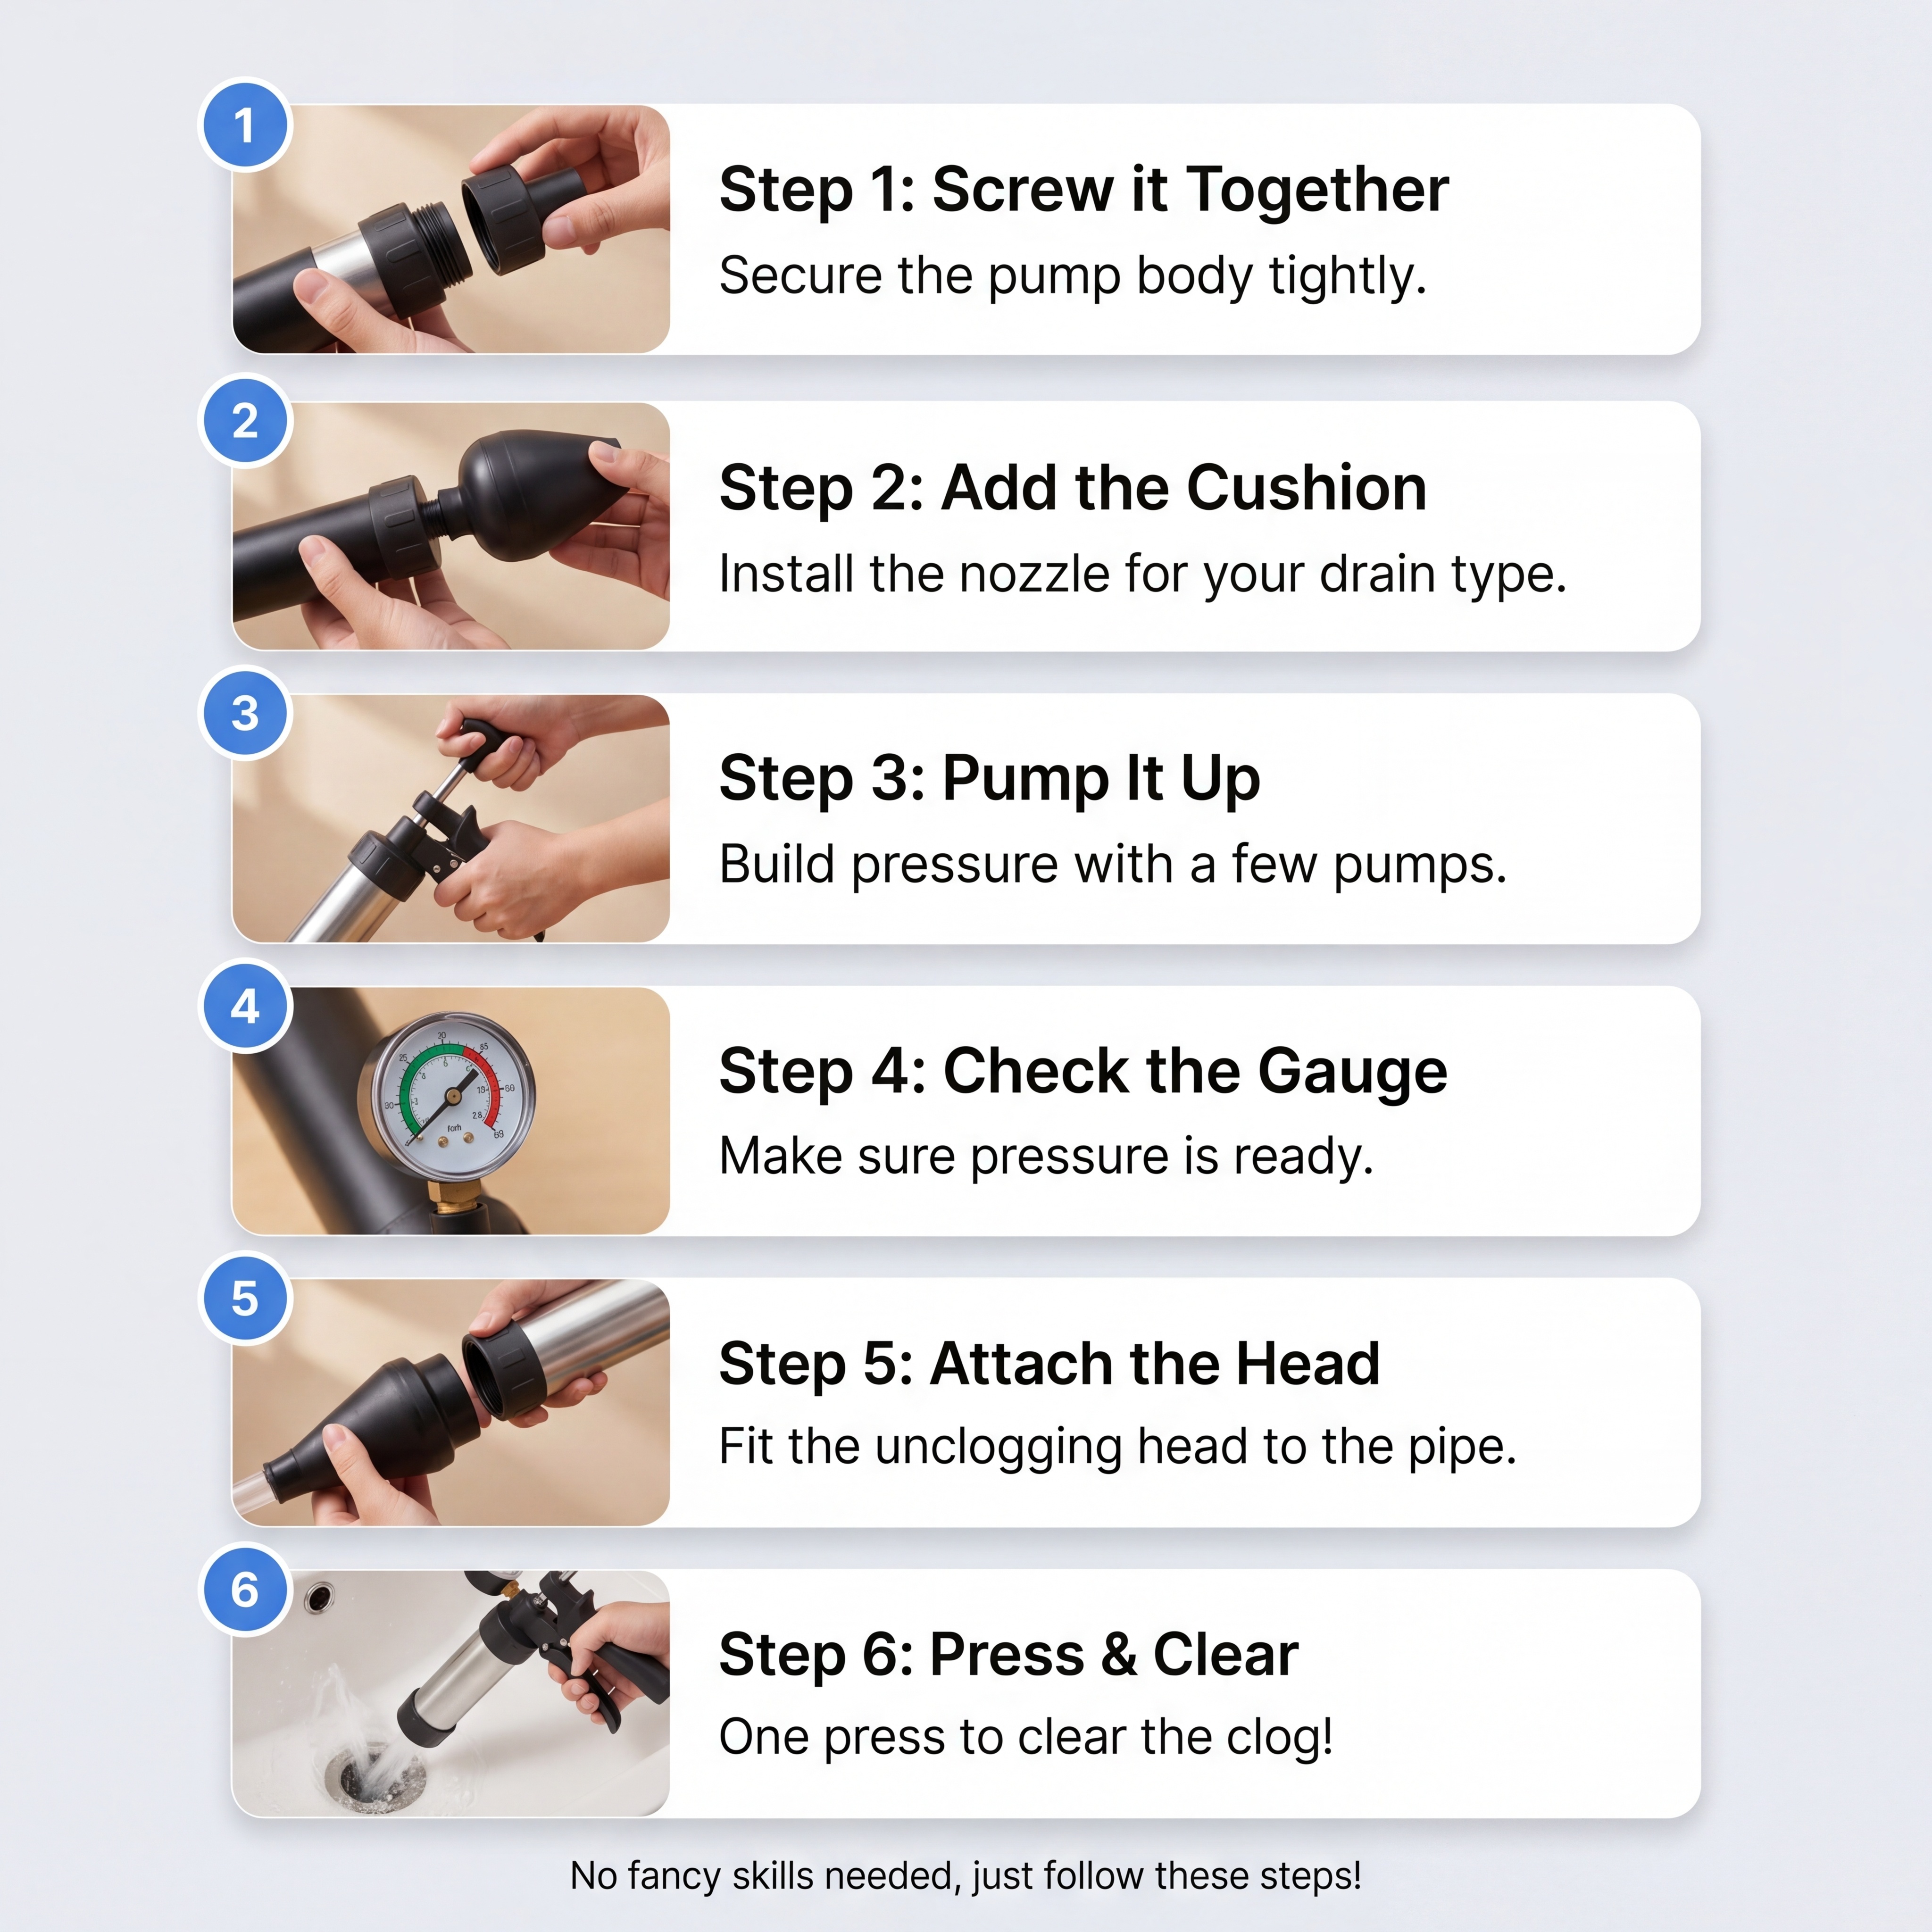
[第5屏] PVC钢丝软管安装使用演示。本屏使用【图1】作为软管产品。 [氛围/风格] 操作演示风格,步骤清晰,真实直观 [元素布局] 画面分为三个步骤区域,从上到下依次展示:第一步测量切割软管,第二步连接管件接头,第三步拧紧固定完成安装;每个步骤放置操作手部和对应软管管件,软管特征保持与原图一致。 [光影质感] 均匀明亮的工作台照明,每个步骤清晰可见,操作动作自然真实 [配色色系] 全局底色 #F0F2F5;工作台浅木色,管件金属银色,文字深蓝色 [视角构图] 垂直三步流程,从上到下阅读动线,每个步骤空间均匀分配 [文字版式] 顶部标题 "Easy Installation & Connection",每个步骤标注 Step 1/2/3 和简短英文说明,文字清晰,步骤明确。 [比例分辨率] 1:1 方图比例,2K分辨率,文字清晰可辨,高清画质。 [负向提示词] 动作变形,软管结构错误,文字错乱,中文字符,背景杂乱
GD222888464
[第5屏] PVC钢丝软管安装使用演示。本屏使用【图1】作为软管产品。 [氛围/风格] 操作演示风格,步骤清晰,真实直观 [元素布局] 画面分为三个步骤区域,从上到下依次展示:第一步测量切割软管,第二步连接管件接头,第三步拧紧固定完成安装;每个步骤放置操作手部和对应软管管件,软管特征保持与原图一致。 [光影质感] 均匀明亮的工作台照明,每个步骤清晰可见,操作动作自然真实 [配色色系] 全局底色 #F0F2F5;工作台浅木色,管件金属银色,文字深蓝色 [视角构图] 垂直三步流程,从上到下阅读动线,每个步骤空间均匀分配 [文字版式] 顶部标题 "Easy Installation & Connection",每个步骤标注 Step 1/2/3 和简短英文说明,文字清晰,步骤明确。 [比例分辨率] 1:1 方图比例,2K分辨率,文字清晰可辨,高清画质。 [负向提示词] 动作变形,软管结构错误,文字错乱,中文字符,背景杂乱
GD222888464


![[Detail Page 5] How to Install - Step by Step Installation Demonstration. Atmosphere style: Clear instructional style, light gray background. Element layout: Three step demonstration arranged vertically. Step 1: Prepare connection pipeline and regulator, Step 2: Connect and tighten the thread, Step 3: Adjust pressure knob and test. Each step has a small operation photo and text description, product maintains original appearance in each step. Lighting: Uniform lighting for each step, clear visibility. Color scheme: Global background #f0f2f5, step numbers blue matching product, text dark gray. Perspective composition: Vertical three-step layout, clear reading flow. Text layout: Top main title "Simple Installation Steps", each step has step number, title and short description, all in English. Proportion resolution: 4:3 ratio, width 2048, height 1536, 4K resolution. Negative prompt: deformation, watermark, text distortion, wrong product, blurry image, cluttered background.](https://gd-cms.dancf.com/gd-cms/xi19e5/0/3f4daf88-b54f-48b8-a1fc-f12143b2aee219345.png?x-oss-process=image/resize,w_640,type_6/sharpen,120/interlace,1)

![[Detail Page 5] How to Install - Step by Step Installation Demonstration. Atmosphere style: Clear instructional style, light gray background. Element layout: Three step demonstration arranged vertically. Step 1: Prepare connection pipeline and regulator, Step 2: Connect and tighten the thread, Step 3: Adjust pressure knob and test. Each step has a small operation photo and text description, product maintains original appearance in each step. Lighting: Uniform lighting for each step, clear visibility. Color scheme: Global background #f0f2f5, step numbers blue matching product, text dark gray. Perspective composition: Vertical three-step layout, clear reading flow. Text layout: Top main title "Simple Installation Steps", each step has step number, title and short description, all in English. Proportion resolution: 4:3 ratio, width 2048, height 1536, 4K resolution. Negative prompt: deformation, watermark, text distortion, wrong product, blurry image, cluttered background.](https://gd-cms.dancf.com/gd-cms/xi19e5/0/e4103da3-f6e3-4c29-a1da-1d9b2e63b1c120768.png?x-oss-process=image/resize,w_640,type_6/sharpen,120/interlace,1)
![[Main image 10] Easy connection and installation demonstration.
[Atmosphere style] Step-by-step demonstration style, clear guidance.
[Image quality] Commercial photography texture, soft and transparent light, clear and real product, clean and advanced picture.
[Elements] Three small pictures combined layout: left picture hand docking hose and connector, middle picture tighten the nut, right picture after the completion of water connection. Our irrigation hose in each step maintains the original color and material. Light gray background overall, three pictures equally divided, clear steps.
[Light and shadow] Even soft studio light, each step picture has clear light, no dead angle.
[Color matching] Light gray background, product color prominent, clean and clear.
[Perspective composition] Horizontal three-grid layout, each step clear, prominent installation convenience.
[Text layout] Top title "Easy Installation & Connection", below each small picture marked step 1 / step 2 / step 3 in English, all text clear, simple and easy to understand.
[Output requirements] 1:1 ratio, clear text, ultra HD commercial photography texture.
[Negative prompt] Deformation, text confusion, blurred product picture, messy background, watermark, e-commerce platform Logo, Chinese text.](https://gd-cms.dancf.com/gd-cms/xi19e5/0/0b16e5da-7fbb-4435-8f27-5a6015db11804661.jpeg?x-oss-process=image/resize,w_640,type_6/sharpen,120/interlace,1)

![[Main image 10] Easy connection and installation demonstration.
[Atmosphere style] Step-by-step demonstration style, clear guidance.
[Image quality] Commercial photography texture, soft and transparent light, clear and real product, clean and advanced picture.
[Elements] Three small pictures combined layout: left picture hand docking hose and connector, middle picture tighten the nut, right picture after the completion of water connection. Our irrigation hose in each step maintains the original color and material. Light gray background overall, three pictures equally divided, clear steps.
[Light and shadow] Even soft studio light, each step picture has clear light, no dead angle.
[Color matching] Light gray background, product color prominent, clean and clear.
[Perspective composition] Horizontal three-grid layout, each step clear, prominent installation convenience.
[Text layout] Top title "Easy Installation & Connection", below each small picture marked step 1 / step 2 / step 3 in English, all text clear, simple and easy to understand.
[Output requirements] 1:1 ratio, clear text, ultra HD commercial photography texture.
[Negative prompt] Deformation, text confusion, blurred product picture, messy background, watermark, e-commerce platform Logo, Chinese text.](https://gd-cms.dancf.com/gd-cms/xi19e5/0/14047c02-a207-4c3e-8ecb-a3105b80073e4604.jpeg?x-oss-process=image/resize,w_640,type_6/sharpen,120/interlace,1)
![[主图-7] 安装步骤图 三步安装流程说明。
[统一基调] 跨境电商高级感 浅灰渐变背景 橙色步骤编号 深灰标题 无衬线字体 三步横排布局。
[画面] 顶部大标题3-Step Easy Installation 副标题Secure Mount No Tools Needed 下方横向分为三等分 三个步骤从左到右排列:Step 1 橙色圆形数字1 标题Insert Through Sink Hole 配图为皂液器从台面上方插入预留孔的截面示意图 橙色向下箭头指示方向 Step 2 橙色圆形数字2 标题Lock & Tighten 配图为从台面下方装入垫圈并顺时针拧紧螺母的示意图 橙色旋转箭头 Step 3 橙色圆形数字3 标题Attach 500ml Bottle 配图为对准底部螺纹顺时针旋紧瓶身的示意图 右下角有一个安装完成的小预览图带对勾标记 底部有提示文字Check All Connections Are Secure After Installation。
[光影质感] 产品示意图干净清晰 台面截面有真实石材纹理 橙色箭头醒目 整体专业易读。
[配色] 浅灰背景 橙色步骤编号和箭头 深灰标题 枪灰色产品 白色台面截面。
[文字版式] 顶部标题居中 三步横排等宽 每步上方圆形数字+标题 下方配图 文字全部英文 清晰可读。
[输出要求] 1:1比例 2048x2048 步骤清晰 图示准确 文字锐利 无变形 无错字 无水印 无中文。](https://gd-cms.dancf.com/gd-cms/xi19e5/0/84cf287d-3061-41f8-afa2-d2813a8c12f7319.jpeg?x-oss-process=image/resize,w_640,type_6/sharpen,120/interlace,1)


![[Installation Steps] PVC Flat Hose 3-step Installation Instruction. 1:1 square ratio for Alibaba International. Keep the original step-by-step operation diagram, maintain product structure, color, and steps unchanged. Replace all Chinese text with natural English. Main Title at the top: "Easy Installation in Three Steps". Step 1 Title: "Step 1: Connect the Fitting", Description: "Align the hose with the connector and insert it firmly". Step 2 Title: "Step 2: Tighten the Lock", Description: "Rotate the clasp clockwise to ensure a leak-proof seal". Step 3 Title: "Step 3: Finish Connection", Description: "Check connection is secure, then ready for water use".
[Style] Minimalist professional cross-border e-commerce style, clean layout, business photography texture. All text in English, no Chinese characters.
[Layout] Keep the three-row vertical layout, each step has operation image on the left and text description on the right. Product accounts for 60% of the space, text area for 40%. All product details and arrow indications are preserved.
[Lighting] Soft uniform lighting, clear product outline, natural shadow, high definition.
[Color] Global background light beige #F5F0E6, main color green hose, auxiliary color dark green text box, black text. Keep color harmony.
[Resolution] 1:1 square ratio, 4K resolution, all text clear and readable, high definition quality.
[Negative prompt] Chinese characters, text garbled, text too small, distorted product, wrong color, watermark, blurry picture](https://gd-cms.dancf.com/gd-cms/xi19e5/0/a0a54c60-05a1-4500-b3ff-1ce52cbad75e13381.jpeg?x-oss-process=image/resize,w_640,type_6/sharpen,120/interlace,1)




![[主图-8] 包装清单与安装配件图,任务是展示全套产品配件,让买家清楚收到的所有物品与安装便利性。
[统一基调] 跨境电商高级厨卫风,干净整洁,开箱质感;主背景为浅灰色渐变台面,标题字为深炭灰色,辅助字为中灰色,强调色为深绿色(代表省心/全套),字体为无衬线英文,布局为Knolling平铺风格。
[画面] 采用俯视平铺(Knolling)构图,所有配件整齐排列在浅灰色台面上:中央上方是皂液器主体(镀铬+黑色磨砂),下方从左到右依次排列:金属锁紧螺母、橡胶垫圈、透明皂液瓶、延长软管、安装说明书(简化为白色小册子)、螺丝包小袋。物品之间间距均匀,排列整齐有序,有轻微自然阴影。画面左上角为标题区,右下角有一个圆形小插图,展示一只手正在轻松拧紧螺母的安装动作小场景。
[光影质感] 俯视棚拍质感,柔和均匀顶光,每个配件都有清晰的轮廓和质感,金属件反光细腻,透明瓶通透,整体干净整洁有品质感。
[配色] 浅灰背景台面,产品本身银黑配色为主,配件多为金属银+透明+白色,强调色深绿色用于标题高亮,整体统一干净。
[文字版式] 左上角大标题"Everything You Need",副标题"Easy Installation in Minutes";每个配件下方用细线引出标注名称:"Soap Dispenser Pump" "Brass Threaded Tube" "Lock Nut" "Rubber Gasket" "Soap Bottle" "Extension Tube" "Installation Manual";右下角小图旁标注"Quick & Easy Install"。底部横排3个绿色对勾卖点:"All Parts Included" "No Special Tools Needed" "Step-by-Step Guide"。所有文字为英文,无衬线字体,标签清晰。
[输出要求] 1:1正方形,2048x2048,配件排列整齐清晰,文字标注准确可读,无变形、无错字、无模糊、无水印、无平台Logo。](https://gd-cms.dancf.com/gd-cms/xi19e5/0/7fec6753-ad3f-4488-88a0-a69bb13eea70513.jpeg?x-oss-process=image/resize,w_640,type_6/sharpen,120/interlace,1)
![[主图-3] 黄铜材质与止水阀工艺细节图,黑色喷枪阀体材质对比证明,全新版式。
[氛围风格] 亚马逊跨境专业信息图,材质工艺对比展示,高级精密感,冷调工业质感。
[画质] 超高清商业微距摄影质感,金属纹理清晰,黄铜截面色泽真实,表面工艺细腻,文字锐利。
[元素] 画面采用左右对比布局:左侧为普通劣质薄款喷枪的剖面示意(管壁薄、材质灰暗),标注为"Ordinary Sprayer";右侧为本品加厚黄铜阀体的真实剖切特写,金色黄铜内壁厚实均匀,黑色哑光外层工艺精细,标注为"Our Sprayer"。中间用VS分隔,突出对比。画面上方为完整的黑色喷枪与止水阀阀体组合外观,止水阀旋钮特写清晰。背景为冷灰色渐变,高级有质感。左下角小窗展示盐雾测试耐腐蚀示意,右下角小窗展示高压防爆测试示意。保持产品外观结构与输入产品图一致,杜绝变形色差。
[光影] 侧光突出金属纹理与黄铜截面质感,明暗对比强烈,边缘光勾勒产品轮廓,精密工业感。
[配色] 主色哑光黑+黄铜金色,背景冷灰,对比色红色VS标识,文字白色。
[视角构图] 上部完整产品,下部左右对比布局,底部两小测试图标,层次丰富对比强烈。
[文字版式] 顶部主标题大号粗体英文"Premium Brass Built to Last"。左右对比区分别标注"Thin Zinc Alloy"与"Thickened Solid Brass",中间"VS"字样醒目。底部测试图标标注"Corrosion Resistant"与"High Pressure Proof"。全部英文,清晰可读。
[输出要求] 1:1比例,2048px*2048px,文字清晰,超高清微距商业摄影质感。
[负向提示词] 变形,文字错乱,产品模糊,背景杂乱,水印,中文。](https://gd-cms.dancf.com/gd-cms/xi19e5/0/d547793b-6053-41cd-84a3-7157347d35345390.jpeg?x-oss-process=image/resize,w_640,type_6/sharpen,120/interlace,1)

![[Main Image 6] Problem comparison diagram of kitchen sink strainer. Light gray background. Left column ordinary product: shows the problem of easy blockage, rust deformation, poor sealing. Right column our product: shows the advantages of smooth filtration, stainless steel anti-rust, good sealing water stop. Each comparison point is labeled with a short English description. Keep our product appearance completely consistent with input image. Clear contrast, highlight product advantages. No trademarks, no Chinese characters. 1:1 square composition, 2K resolution. Negative prompt: deformation, text confusion, blurred product image, messy background, watermark, trademarks, Chinese characters.](https://gd-cms.dancf.com/gd-cms/xi19e5/0/98be269b-bd45-4caf-a5e6-e98016359cfa73502.jpeg?x-oss-process=image/resize,w_640,type_6/sharpen,120/interlace,1)

![[第7屏] 安装步骤 - 六步安装流程图文说明。本屏使用【图8】作为商品主体。
[氛围/风格] 跨境电商教程说明风,深蓝星空渐变背景,步骤卡片清晰排列,专业易懂,商业摄影质感。
[元素布局] 2列3行共6个步骤卡片排列,每个卡片含操作特写图 + 步骤编号 + 英文说明:步骤1底座放入安装孔、步骤2螺丝半紧调孔距、步骤3盖板孔对准卡入、步骤4调节盖板位置、步骤5按下按钮取出、步骤6拧紧螺丝重新卡入;产品部件、工具、操作动作与输入图一致。
[光影质感] 均匀柔光,每个步骤图清晰明亮,卡片有轻微阴影浮起感。
[配色色系] 全局底色 #1A2744 深蓝星空渐变;主色白色步骤卡片 + 白色产品;辅助色 #FFD700 金色步骤编号 + 白色文字。
[视角构图] 网格布局2×3,阅读动线顶部标题 → 从左到右从上到下依次阅读步骤。
[文字版式] 顶部居中大标题 "One-Click Base Installation",白色粗体无衬线字体;每个步骤卡片左上角圆形金色编号 "1"-"6",下方英文步骤说明:1. Place base into toilet mounting holes 2. Half-tighten screws to adjust hole spacing 3. Align and click toilet seat into place 4. Adjust seat to proper position 5. Press button to release 6. Tighten screws and reattach;文字清晰可读。
[比例分辨率] 9:16 竖版比例,4K 分辨率,文字清晰可辨,高清画质。
[负向提示词] 产品变形,缺件错件,结构错误,颜色偏差,中文字符,水印,文字错乱,文字过小,产品图模糊。](https://gd-cms.dancf.com/gd-cms/xi19e5/0/28a29989-bdf2-4ff0-9c6b-a6335b48085a5651.jpeg?x-oss-process=image/resize,w_640,type_6/sharpen,120/interlace,1)


![[主图-7] 配件全家福与包装内容图,展示皂液器全套配件,让买家清楚了解购买所得。
[统一基调] 跨境电商高级厨卫风,浅灰白色背景,英文标题,无衬线字体,Knolling平铺陈列风格。
[画面] 画面采用俯视平铺(Knolling)方式,整齐排列皂液器全套配件:上方中央是皂液器主体(泵头+瓶身组合),左下方是盘绕成圆形的透明延长管带金属重锤,延长管中间区域摆放三个黑色固定卡扣、一个黑色螺纹塞、一个蓝色硅胶瓶塞。各配件之间间距均匀,排列有序,有轻微投影。左上角有标题,底部有一行总结文字。
[光影质感] 棚拍俯视角度,光线均匀柔和,每件物品底部有自然浅灰色投影,金属件有细腻高光,塑料和硅胶件质感真实。
[配色] 浅灰白色背景,主体拉丝金,透明管+黑色配件+蓝色硅胶塞形成色彩层次,标题深灰色。
[文字版式] 左上角大标题"Complete Package All You Need",粗体无衬线深灰色大字;底部中央一行小字"1x Soap Dispenser Pump 1x Bottle 1x Extension Tube Mounting Hardware Included",小号无衬线字体。各配件旁有极小号名称标注:"Pump Head"、"500ml Bottle"、"Extension Tube"、"Mounting Clips"、"Threaded Plug"、"Silicone Stopper"。
[输出要求] 1:1正方形,2048x2048,配件排列整齐清晰,质感真实,英文清晰。负向:中文、杂乱堆放、配件缺失、变形、模糊、水印、厚重边框。](https://gd-cms.dancf.com/gd-cms/xi19e5/0/1eb9f8db-f554-4c01-9e4b-5f2bdb0c36a25202.jpeg?x-oss-process=image/resize,w_640,type_6/sharpen,120/interlace,1)

![[第5屏] PVC钢丝软管安装使用演示。本屏使用【图1】作为软管产品。
[氛围/风格] 操作演示风格,步骤清晰,真实直观
[元素布局] 画面分为三个步骤区域,从上到下依次展示:第一步测量切割软管,第二步连接管件接头,第三步拧紧固定完成安装;每个步骤放置操作手部和对应软管管件,软管特征保持与原图一致。
[光影质感] 均匀明亮的工作台照明,每个步骤清晰可见,操作动作自然真实
[配色色系] 全局底色 #F0F2F5;工作台浅木色,管件金属银色,文字深蓝色
[视角构图] 垂直三步流程,从上到下阅读动线,每个步骤空间均匀分配
[文字版式] 顶部标题 "Easy Installation & Connection",每个步骤标注 Step 1/2/3 和简短英文说明,文字清晰,步骤明确。
[比例分辨率] 1:1 方图比例,2K分辨率,文字清晰可辨,高清画质。
[负向提示词] 动作变形,软管结构错误,文字错乱,中文字符,背景杂乱](https://gd-cms.dancf.com/gd-cms/xi19e5/0/b6dbc76d-a27e-498d-b168-8c421e53802a13216.png?x-oss-process=image/resize,w_640,type_6/sharpen,120/interlace,1)
![[第5屏] PVC钢丝软管安装使用演示。本屏使用【图1】作为软管产品。
[氛围/风格] 操作演示风格,步骤清晰,真实直观
[元素布局] 画面分为三个步骤区域,从上到下依次展示:第一步测量切割软管,第二步连接管件接头,第三步拧紧固定完成安装;每个步骤放置操作手部和对应软管管件,软管特征保持与原图一致。
[光影质感] 均匀明亮的工作台照明,每个步骤清晰可见,操作动作自然真实
[配色色系] 全局底色 #F0F2F5;工作台浅木色,管件金属银色,文字深蓝色
[视角构图] 垂直三步流程,从上到下阅读动线,每个步骤空间均匀分配
[文字版式] 顶部标题 "Easy Installation & Connection",每个步骤标注 Step 1/2/3 和简短英文说明,文字清晰,步骤明确。
[比例分辨率] 1:1 方图比例,2K分辨率,文字清晰可辨,高清画质。
[负向提示词] 动作变形,软管结构错误,文字错乱,中文字符,背景杂乱](https://gd-cms.dancf.com/gd-cms/xi19e5/0/d5f3ddec-9972-41c9-93d2-1e9d819bfd2f13231.png?x-oss-process=image/resize,w_640,type_6/sharpen,120/interlace,1)