
创意预览图

Strictly follow the layout, composition, all product shapes, all accessory shapes, background style

用户头像

1q8f2y3osk-...

2026.08.22
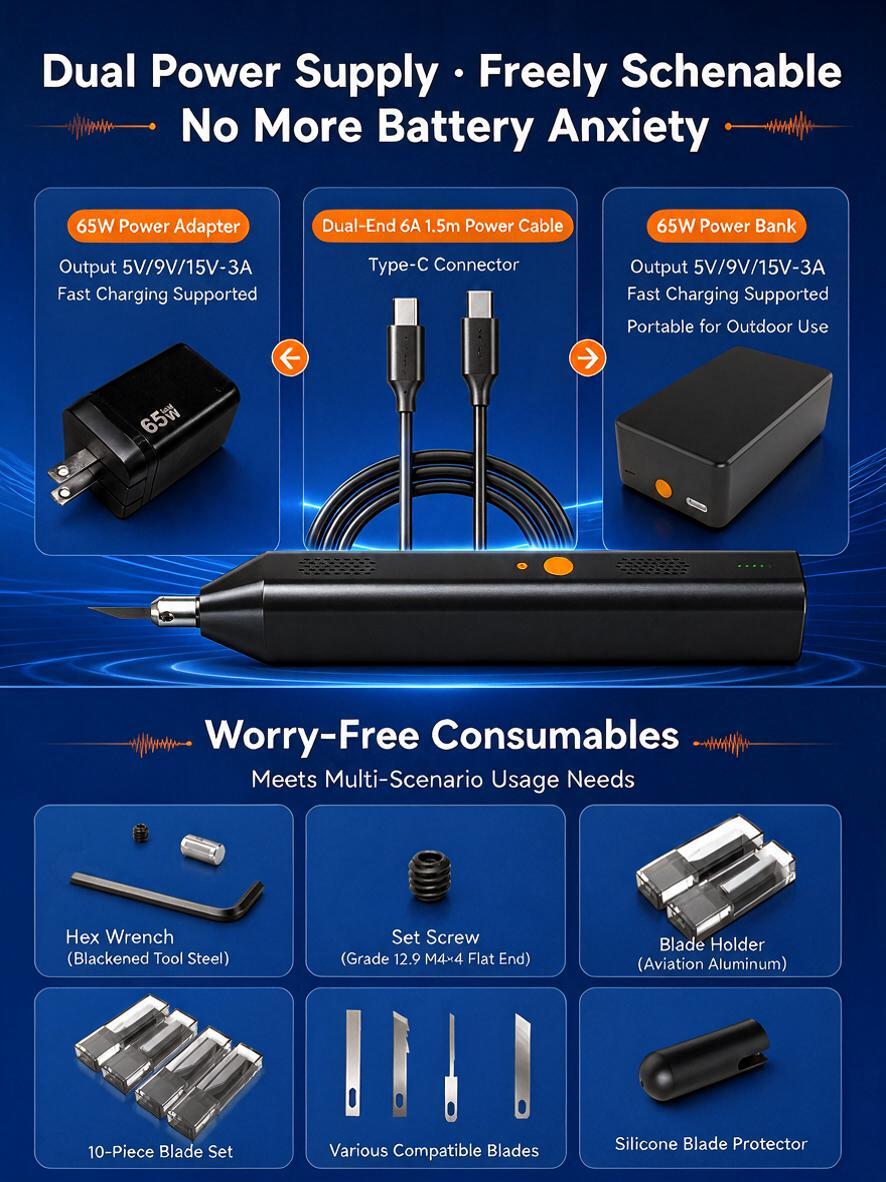
[详情页-8] 双供电模式与耗材配件展示。 [商品] 使用图1和图8产品图,展示主机、适配器、充电宝、电源线、刀片套件等配件。 [画面] 页面目标:展示双供电便利性和丰富耗材配件。上半部分为双供电模式区,左右分栏展示65W适配器和65W充电宝,中间放双口Type-C电源线;下半部分为耗材无忧区,展示内六角扳手、顶紧螺丝、刀夹、刀片套件、硅胶刀头防护套等配件。背景深蓝色。 [视觉] 套系策略:风格=国内五金器械专业科技商业摄影;标题字=现代无衬线粗体;正文字=简洁无衬线体;主色=深蓝色(#1a56db);背景延展=基于深蓝色做深浅层级渐变、科技几何切面和声波波纹暗纹;强调色=橙色(#f97316),仅用于小面积图标、引线、标签和重点按钮;标题色=白色;正文色=浅灰色(#e5e7eb);组件=圆角信息卡、细线引线、胶囊标签;光影=左前侧科技冷光,金属刀头高光,黑色机身细腻光泽。 [文字] 顶部主标题"双供电模式自由切换 彻底解决续航焦虑"(白色粗体大字)。上半区左:"65W电源适配器 输出 5V/9V/15V-3A 支持快充",右:"65W充电宝 输出 5V/9V/15V-3A 支持快充 户外便携",中间"双口6A-1.5米电源线 Type-C接口"。下半区标题"耗材无忧 满足多场景使用需求"(白色粗体),配件名称:内六角扳手(工具钢发黑)、顶紧螺丝(12.9级M4*4平端)、刀夹(航空铝材质)、10片装刀片套件、多种适配刀片、硅胶刀头防护套(每个配件配小图和名称)。 [规格] 图片比例3:4竖版,4K,避免变形、错字、文字过小、冷蓝偏色、产品颜色改变、结构失真、水印、平台Logo。[详情页-8] 双供电模式与耗材配件展示。
[商品] 使用图1和图8产品图,展示主机、适配器、充电宝、电源线、刀片套件等配件。
[画面] 页面目标:展示双供电便利性和丰富耗材配件。上半部分为双供电模式区,左右分栏展示65W适配器和65W充电宝,中间放双口Type-C电源线;下半部分为耗材无忧区,展示内六角扳手、顶紧螺丝、刀夹、刀片套件、硅胶刀头防护套等配件。背景深蓝色。
[视觉] 套系策略:风格=国内五金器械专业科技商业摄影;标题字=现代无衬线粗体;正文字=简洁无衬线体;主色=深蓝色(#1a56db);背景延展=基于深蓝色做深浅层级渐变、科技几何切面和声波波纹暗纹;强调色=橙色(#f97316),仅用于小面积图标、引线、标签和重点按钮;标题色=白色;正文色=浅灰色(#e5e7eb);组件=圆角信息卡、细线引线、胶囊标签;光影=左前侧科技冷光,金属刀头高光,黑色机身细腻光泽。
[文字] 顶部主标题"双供电模式自由切换 彻底解决续航焦虑"(白色粗体大字)。上半区左:"65W电源适配器 输出 5V/9V/15V-3A 支持快充",右:"65W充电宝 输出 5V/9V/15V-3A 支持快充 户外便携",中间"双口6A-1.5米电源线 Type-C接口"。下半区标题"耗材无忧 满足多场景使用需求"(白色粗体),配件名称:内六角扳手(工具钢发黑)、顶紧螺丝(12.9级M4*4平端)、刀夹(航空铝材质)、10片装刀片套件、多种适配刀片、硅胶刀头防护套(每个配件配小图和名称)。
[规格] 图片比例3:4竖版,4K,避免变形、错字、文字过小、冷蓝偏色、产品颜色改变、结构失真、水印、平台Logo。
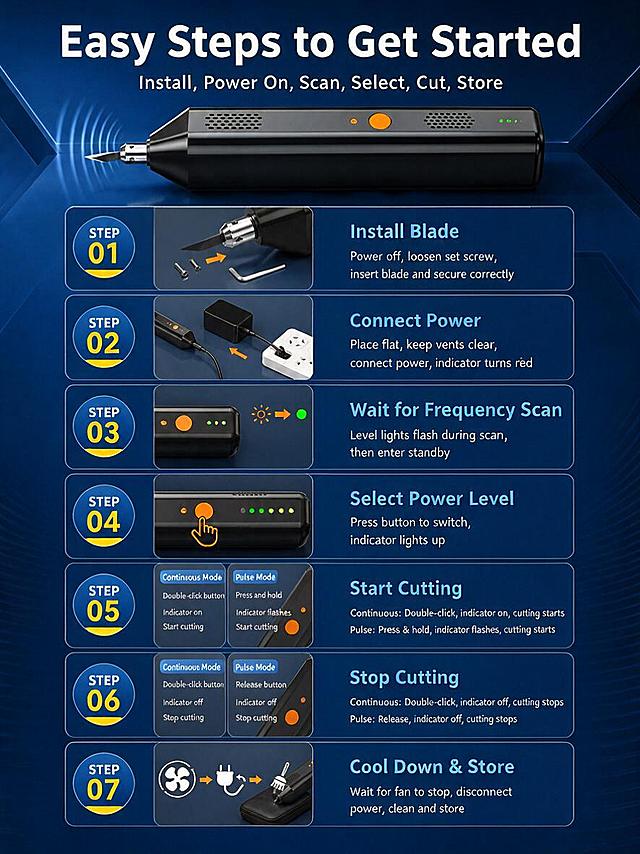
Strictly follow the layout, composition, product shape, all 7 step panels with illustrations, background style and color of the reference image. Only replace all Chinese text with English. Product and all step illustrations must remain exactly the same. Text replacements: - 使用步骤 简单易上手 → Easy Steps to Get Started - 安装 通电 扫频 选档 切割 收纳 → Install, Power On, Scan, Select, Cut, Store - 安装刀片 → Install Blade - 断电拧松顶紧螺丝 装入刀片并按方向要求固定 → Power off, loosen set screw, insert blade and secure correctly - 连接电源 → Connect Power - 放平主机 保持散热孔无遮挡 连接原装电源 电源指示灯亮红灯 → Place flat, keep vents clear, connect power, indicator turns red - 等待扫频 → Wait for Frequency Scan - 档位灯闪烁开始扫频 熄灭后进入待机状态 → Level lights flash during scan, then enter standby - 选择档位 → Select Power Level - 点按按键切换档位 对应档位指示灯亮 → Press button to switch, indicator lights up - 开始切割 → Start Cutting - 连续模式 双击按键 工作指示灯亮 开始切割 → Continuous: Double-click, indicator on, cutting starts - 点动模式 按住按键 工作指示灯闪烁 开始切割 → Pulse: Press & hold, indicator flashes, cutting starts - 连续模式 → Continuous Mode - 点动模式 → Pulse Mode - 双击按键 → Double-click button - 按住按键 → Press and hold - 工作指示灯亮 → Indicator on - 工作指示灯闪烁 → Indicator flashes - 开始切割 → Start cutting - 停止切割 → Stop Cutting - 连续模式 双击按键 工作指示灯熄灭 停止切割 → Continuous: Double-click, indicator off, cutting stops - 点动模式 松开按键 工作指示灯熄灭 停止切割 → Pulse: Release, indicator off, cutting stops - 松开按键 → Release button - 工作指示灯熄灭 → Indicator off - 停止切割 → Stop cutting - 冷却收纳 → Cool Down & Store - 停止后待风扇停止转动 再断电 清理收纳 → Wait for fan to stop, disconnect power, clean and store All text in English. Same font style, same colors, same positions. Product and all illustrations unchanged.Strictly follow the layout, composition, product shape, all 7 step panels with illustrations, background style and color of the reference image. Only replace all Chinese text with English. Product and all step illustrations must remain exactly the same.

Text replacements:
- 使用步骤 简单易上手 → Easy Steps to Get Started
- 安装 通电 扫频 选档 切割 收纳 → Install, Power On, Scan, Select, Cut, Store
- 安装刀片 → Install Blade
- 断电拧松顶紧螺丝 装入刀片并按方向要求固定 → Power off, loosen set screw, insert blade and secure correctly
- 连接电源 → Connect Power
- 放平主机 保持散热孔无遮挡 连接原装电源 电源指示灯亮红灯 → Place flat, keep vents clear, connect power, indicator turns red
- 等待扫频 → Wait for Frequency Scan
- 档位灯闪烁开始扫频 熄灭后进入待机状态 → Level lights flash during scan, then enter standby
- 选择档位 → Select Power Level
- 点按按键切换档位 对应档位指示灯亮 → Press button to switch, indicator lights up
- 开始切割 → Start Cutting
- 连续模式 双击按键 工作指示灯亮 开始切割 → Continuous: Double-click, indicator on, cutting starts
- 点动模式 按住按键 工作指示灯闪烁 开始切割 → Pulse: Press & hold, indicator flashes, cutting starts
- 连续模式 → Continuous Mode
- 点动模式 → Pulse Mode
- 双击按键 → Double-click button
- 按住按键 → Press and hold
- 工作指示灯亮 → Indicator on
- 工作指示灯闪烁 → Indicator flashes
- 开始切割 → Start cutting
- 停止切割 → Stop Cutting
- 连续模式 双击按键 工作指示灯熄灭 停止切割 → Continuous: Double-click, indicator off, cutting stops
- 点动模式 松开按键 工作指示灯熄灭 停止切割 → Pulse: Release, indicator off, cutting stops
- 松开按键 → Release button
- 工作指示灯熄灭 → Indicator off
- 停止切割 → Stop cutting
- 冷却收纳 → Cool Down & Store
- 停止后待风扇停止转动 再断电 清理收纳 → Wait for fan to stop, disconnect power, clean and store

All text in English. Same font style, same colors, same positions. Product and all illustrations unchanged.
Strictly follow the layout, composition, product shape, all 7 step panels with illustrations, background style and color of the reference image. Only replace all Chinese text with English. Product and all step illustrations must remain exactly the same. Text replacements: - 使用步骤 简单易上手 → Easy Steps to Get Started - 安装 通电 扫频 选档 切割 收纳 → Install, Power On, Scan, Select, Cut, Store - 安装刀片 → Install Blade - 断电拧松顶紧螺丝 装入刀片并按方向要求固定 → Power off, loosen set screw, insert blade and secure correctly - 连接电源 → Connect Power - 放平主机 保持散热孔无遮挡 连接原装电源 电源指示灯亮红灯 → Place flat, keep vents clear, connect power, indicator turns red - 等待扫频 → Wait for Frequency Scan - 档位灯闪烁开始扫频 熄灭后进入待机状态 → Level lights flash during scan, then enter standby - 选择档位 → Select Power Level - 点按按键切换档位 对应档位指示灯亮 → Press button to switch, indicator lights up - 开始切割 → Start Cutting - 连续模式 双击按键 工作指示灯亮 开始切割 → Continuous: Double-click, indicator on, cutting starts - 点动模式 按住按键 工作指示灯闪烁 开始切割 → Pulse: Press & hold, indicator flashes, cutting starts - 连续模式 → Continuous Mode - 点动模式 → Pulse Mode - 双击按键 → Double-click button - 按住按键 → Press and hold - 工作指示灯亮 → Indicator on - 工作指示灯闪烁 → Indicator flashes - 开始切割 → Start cutting - 停止切割 → Stop Cutting - 连续模式 双击按键 工作指示灯熄灭 停止切割 → Continuous: Double-click, indicator off, cutting stops - 点动模式 松开按键 工作指示灯熄灭 停止切割 → Pulse: Release, indicator off, cutting stops - 松开按键 → Release button - 工作指示灯熄灭 → Indicator off - 停止切割 → Stop cutting - 冷却收纳 → Cool Down & Store - 停止后待风扇停止转动 再断电 清理收纳 → Wait for fan to stop, disconnect power, clean and store All text in English. Same font style, same colors, same positions. Product and all illustrations unchanged.Strictly follow the layout, composition, product shape, all 7 step panels with illustrations, background style and color of the reference image. Only replace all Chinese text with English. Product and all step illustrations must remain exactly the same.

Text replacements:
- 使用步骤 简单易上手 → Easy Steps to Get Started
- 安装 通电 扫频 选档 切割 收纳 → Install, Power On, Scan, Select, Cut, Store
- 安装刀片 → Install Blade
- 断电拧松顶紧螺丝 装入刀片并按方向要求固定 → Power off, loosen set screw, insert blade and secure correctly
- 连接电源 → Connect Power
- 放平主机 保持散热孔无遮挡 连接原装电源 电源指示灯亮红灯 → Place flat, keep vents clear, connect power, indicator turns red
- 等待扫频 → Wait for Frequency Scan
- 档位灯闪烁开始扫频 熄灭后进入待机状态 → Level lights flash during scan, then enter standby
- 选择档位 → Select Power Level
- 点按按键切换档位 对应档位指示灯亮 → Press button to switch, indicator lights up
- 开始切割 → Start Cutting
- 连续模式 双击按键 工作指示灯亮 开始切割 → Continuous: Double-click, indicator on, cutting starts
- 点动模式 按住按键 工作指示灯闪烁 开始切割 → Pulse: Press & hold, indicator flashes, cutting starts
- 连续模式 → Continuous Mode
- 点动模式 → Pulse Mode
- 双击按键 → Double-click button
- 按住按键 → Press and hold
- 工作指示灯亮 → Indicator on
- 工作指示灯闪烁 → Indicator flashes
- 开始切割 → Start cutting
- 停止切割 → Stop Cutting
- 连续模式 双击按键 工作指示灯熄灭 停止切割 → Continuous: Double-click, indicator off, cutting stops
- 点动模式 松开按键 工作指示灯熄灭 停止切割 → Pulse: Release, indicator off, cutting stops
- 松开按键 → Release button
- 工作指示灯熄灭 → Indicator off
- 停止切割 → Stop cutting
- 冷却收纳 → Cool Down & Store
- 停止后待风扇停止转动 再断电 清理收纳 → Wait for fan to stop, disconnect power, clean and store

All text in English. Same font style, same colors, same positions. Product and all illustrations unchanged.
将图中所有中文文字替换为英文,产品和配件的形状、位置、颜色、构图完全保持不变,背景和版式完全不变。 文字替换对应: - 切割不等于焊接 选对才好用 → Cutting ≠ Welding · Choose the Right Tool - 【超声波切割】高频震切 精准分离 → Ultrasonic Cutting — High-Freq Vibration, Precision Separation - 核心原理 → Core Principle - 利用超声波高频微振 打散材料分子结构 实现无痛裁断 → Ultrasonic high-freq micro-vibration breaks down material structure for clean cutting - 工艺作用 → Process Function - 拆分、修边、裁切、整形 → Separating, trimming, cutting, shaping - 成品效果 → Finish Result - 切面平整 无毛刺 不焦边 不拉丝 → Smooth cut, no burrs, no burn, no fraying - 适用材质 → Compatible Materials - 布料、无纺布、硅胶、橡胶、食品、塑胶水口 → Fabric, non-woven, silicone, rubber, food, plastic sprues - 【超声波焊接】振动融接 合二为一 → Ultrasonic Welding — Vibration Fusion Bonding - 高频摩擦生热 使接触面瞬间熔融 加压固化一体 → High-freq friction heat, instant melting, pressure bonding - 贴合、密封、拼接、固定 → Bonding, sealing, splicing, fixing - 无缝粘合 防水密封 牢固不开裂 无需胶水 → Seamless bond, waterproof seal, strong & crack-free, no glue needed - 各类塑料件、无纺布、化纤织物、复合材质 → Various plastics, non-woven, chemical fiber, composites - 切割 = 做分离 → Cutting = Separation - 焊接 = 做结合 → Welding = Bonding - 振动同源 工艺双向 按需选用 → Same vibration source, dual-process, choose as needed - 我们从核心元件设计 颠覆传统思路 解决切割振幅小 效率低 发热严重等问题 → Redesigned from core components — solving low amplitude, low efficiency, and overheating issues 所有文字为英文,字体风格保持粗体无衬线,颜色和位置不变,产品和配件完全不变。将图中所有中文文字替换为英文,产品和配件的形状、位置、颜色、构图完全保持不变,背景和版式完全不变。
文字替换对应:
- 切割不等于焊接 选对才好用 → Cutting ≠ Welding · Choose the Right Tool
- 【超声波切割】高频震切 精准分离 → Ultrasonic Cutting — High-Freq Vibration, Precision Separation
- 核心原理 → Core Principle
- 利用超声波高频微振 打散材料分子结构 实现无痛裁断 → Ultrasonic high-freq micro-vibration breaks down material structure for clean cutting
- 工艺作用 → Process Function
- 拆分、修边、裁切、整形 → Separating, trimming, cutting, shaping
- 成品效果 → Finish Result
- 切面平整 无毛刺 不焦边 不拉丝 → Smooth cut, no burrs, no burn, no fraying
- 适用材质 → Compatible Materials
- 布料、无纺布、硅胶、橡胶、食品、塑胶水口 → Fabric, non-woven, silicone, rubber, food, plastic sprues
- 【超声波焊接】振动融接 合二为一 → Ultrasonic Welding — Vibration Fusion Bonding
- 高频摩擦生热 使接触面瞬间熔融 加压固化一体 → High-freq friction heat, instant melting, pressure bonding
- 贴合、密封、拼接、固定 → Bonding, sealing, splicing, fixing
- 无缝粘合 防水密封 牢固不开裂 无需胶水 → Seamless bond, waterproof seal, strong & crack-free, no glue needed
- 各类塑料件、无纺布、化纤织物、复合材质 → Various plastics, non-woven, chemical fiber, composites
- 切割 = 做分离 → Cutting = Separation
- 焊接 = 做结合 → Welding = Bonding
- 振动同源 工艺双向 按需选用 → Same vibration source, dual-process, choose as needed
- 我们从核心元件设计 颠覆传统思路 解决切割振幅小 效率低 发热严重等问题 → Redesigned from core components — solving low amplitude, low efficiency, and overheating issues
所有文字为英文,字体风格保持粗体无衬线,颜色和位置不变,产品和配件完全不变。
将图中所有中文文字替换为英文,产品和配件的形状、位置、颜色、构图完全保持不变,背景和版式完全不变。 文字替换对应: - 切割不等于焊接 选对才好用 → Cutting ≠ Welding · Choose the Right Tool - 【超声波切割】高频震切 精准分离 → Ultrasonic Cutting — High-Freq Vibration, Precision Separation - 核心原理 → Core Principle - 利用超声波高频微振 打散材料分子结构 实现无痛裁断 → Ultrasonic high-freq micro-vibration breaks down material structure for clean cutting - 工艺作用 → Process Function - 拆分、修边、裁切、整形 → Separating, trimming, cutting, shaping - 成品效果 → Finish Result - 切面平整 无毛刺 不焦边 不拉丝 → Smooth cut, no burrs, no burn, no fraying - 适用材质 → Compatible Materials - 布料、无纺布、硅胶、橡胶、食品、塑胶水口 → Fabric, non-woven, silicone, rubber, food, plastic sprues - 【超声波焊接】振动融接 合二为一 → Ultrasonic Welding — Vibration Fusion Bonding - 高频摩擦生热 使接触面瞬间熔融 加压固化一体 → High-freq friction heat, instant melting, pressure bonding - 贴合、密封、拼接、固定 → Bonding, sealing, splicing, fixing - 无缝粘合 防水密封 牢固不开裂 无需胶水 → Seamless bond, waterproof seal, strong & crack-free, no glue needed - 各类塑料件、无纺布、化纤织物、复合材质 → Various plastics, non-woven, chemical fiber, composites - 切割 = 做分离 → Cutting = Separation - 焊接 = 做结合 → Welding = Bonding - 振动同源 工艺双向 按需选用 → Same vibration source, dual-process, choose as needed - 我们从核心元件设计 颠覆传统思路 解决切割振幅小 效率低 发热严重等问题 → Redesigned from core components — solving low amplitude, low efficiency, and overheating issues 所有文字为英文,字体风格保持粗体无衬线,颜色和位置不变,产品和配件完全不变。将图中所有中文文字替换为英文,产品和配件的形状、位置、颜色、构图完全保持不变,背景和版式完全不变。
文字替换对应:
- 切割不等于焊接 选对才好用 → Cutting ≠ Welding · Choose the Right Tool
- 【超声波切割】高频震切 精准分离 → Ultrasonic Cutting — High-Freq Vibration, Precision Separation
- 核心原理 → Core Principle
- 利用超声波高频微振 打散材料分子结构 实现无痛裁断 → Ultrasonic high-freq micro-vibration breaks down material structure for clean cutting
- 工艺作用 → Process Function
- 拆分、修边、裁切、整形 → Separating, trimming, cutting, shaping
- 成品效果 → Finish Result
- 切面平整 无毛刺 不焦边 不拉丝 → Smooth cut, no burrs, no burn, no fraying
- 适用材质 → Compatible Materials
- 布料、无纺布、硅胶、橡胶、食品、塑胶水口 → Fabric, non-woven, silicone, rubber, food, plastic sprues
- 【超声波焊接】振动融接 合二为一 → Ultrasonic Welding — Vibration Fusion Bonding
- 高频摩擦生热 使接触面瞬间熔融 加压固化一体 → High-freq friction heat, instant melting, pressure bonding
- 贴合、密封、拼接、固定 → Bonding, sealing, splicing, fixing
- 无缝粘合 防水密封 牢固不开裂 无需胶水 → Seamless bond, waterproof seal, strong & crack-free, no glue needed
- 各类塑料件、无纺布、化纤织物、复合材质 → Various plastics, non-woven, chemical fiber, composites
- 切割 = 做分离 → Cutting = Separation
- 焊接 = 做结合 → Welding = Bonding
- 振动同源 工艺双向 按需选用 → Same vibration source, dual-process, choose as needed
- 我们从核心元件设计 颠覆传统思路 解决切割振幅小 效率低 发热严重等问题 → Redesigned from core components — solving low amplitude, low efficiency, and overheating issues
所有文字为英文,字体风格保持粗体无衬线,颜色和位置不变,产品和配件完全不变。
[详情页-9] 使用步骤,7步操作流程说明。 [商品] 使用图1产品图,切割刀主机置于画面顶部,保留全部外观结构。 [画面] 页面目标:清晰展示从安装到收纳的完整操作流程。顶部产品图+标题,下方纵向排列7个步骤,每个步骤左侧有圆形STEP编号(01-07),右侧为步骤标题和简短说明。步骤编号用黄色底部装饰。背景深蓝色。 [视觉] 套系策略:风格=国内五金器械专业科技商业摄影;标题字=现代无衬线粗体;正文字=简洁无衬线体;主色=深蓝色(#1a56db);背景延展=基于深蓝色做深浅层级渐变、科技几何切面和声波波纹暗纹;强调色=橙色(#f97316),仅用于小面积图标、引线、标签和重点按钮;标题色=白色;正文色=浅灰色(#e5e7eb);组件=圆角信息卡、细线引线、胶囊标签;光影=左前侧科技冷光,金属刀头高光,黑色机身细腻光泽。 [文字] 顶部主标题"使用步骤 简单易上手"(白色粗体大字),副标题"安装 通电 扫频 选档 切割 收纳"(浅灰色小字)。7个步骤:STEP01 安装刀片-断电拧松顶紧螺丝 装入刀片并按方向要求固定;STEP02 连接电源-放平主机 保持散热孔无遮挡 连接原装电源 电源指示灯亮红灯;STEP03 等待扫频-档位灯闪烁开始扫频 熄灭后进入待机状态;STEP04 选择档位-点按按键切换档位 对应档位指示灯亮;STEP05 开始切割-连续模式 双击按键 工作指示灯亮 开始切割 点动模式 按住按键 工作指示灯闪烁 开始切割;STEP06 停止切割-连续模式 双击按键 工作指示灯熄灭 停止切割 点动模式 松开按键 工作指示灯熄灭 停止切割;STEP07 冷却收纳-停止后待风扇停止转动 再断电 清理收纳。 [规格] 图片比例3:4竖版,4K,避免变形、错字、文字过小、冷蓝偏色、产品颜色改变、结构失真、水印、平台Logo。[详情页-9] 使用步骤,7步操作流程说明。
[商品] 使用图1产品图,切割刀主机置于画面顶部,保留全部外观结构。
[画面] 页面目标:清晰展示从安装到收纳的完整操作流程。顶部产品图+标题,下方纵向排列7个步骤,每个步骤左侧有圆形STEP编号(01-07),右侧为步骤标题和简短说明。步骤编号用黄色底部装饰。背景深蓝色。
[视觉] 套系策略:风格=国内五金器械专业科技商业摄影;标题字=现代无衬线粗体;正文字=简洁无衬线体;主色=深蓝色(#1a56db);背景延展=基于深蓝色做深浅层级渐变、科技几何切面和声波波纹暗纹;强调色=橙色(#f97316),仅用于小面积图标、引线、标签和重点按钮;标题色=白色;正文色=浅灰色(#e5e7eb);组件=圆角信息卡、细线引线、胶囊标签;光影=左前侧科技冷光,金属刀头高光,黑色机身细腻光泽。
[文字] 顶部主标题"使用步骤 简单易上手"(白色粗体大字),副标题"安装 通电 扫频 选档 切割 收纳"(浅灰色小字)。7个步骤:STEP01 安装刀片-断电拧松顶紧螺丝 装入刀片并按方向要求固定;STEP02 连接电源-放平主机 保持散热孔无遮挡 连接原装电源 电源指示灯亮红灯;STEP03 等待扫频-档位灯闪烁开始扫频 熄灭后进入待机状态;STEP04 选择档位-点按按键切换档位 对应档位指示灯亮;STEP05 开始切割-连续模式 双击按键 工作指示灯亮 开始切割 点动模式 按住按键 工作指示灯闪烁 开始切割;STEP06 停止切割-连续模式 双击按键 工作指示灯熄灭 停止切割 点动模式 松开按键 工作指示灯熄灭 停止切割;STEP07 冷却收纳-停止后待风扇停止转动 再断电 清理收纳。
[规格] 图片比例3:4竖版,4K,避免变形、错字、文字过小、冷蓝偏色、产品颜色改变、结构失真、水印、平台Logo。
[详情页-9] 使用步骤,7步操作流程说明。 [商品] 使用图1产品图,切割刀主机置于画面顶部,保留全部外观结构。 [画面] 页面目标:清晰展示从安装到收纳的完整操作流程。顶部产品图+标题,下方纵向排列7个步骤,每个步骤左侧有圆形STEP编号(01-07),右侧为步骤标题和简短说明。步骤编号用黄色底部装饰。背景深蓝色。 [视觉] 套系策略:风格=国内五金器械专业科技商业摄影;标题字=现代无衬线粗体;正文字=简洁无衬线体;主色=深蓝色(#1a56db);背景延展=基于深蓝色做深浅层级渐变、科技几何切面和声波波纹暗纹;强调色=橙色(#f97316),仅用于小面积图标、引线、标签和重点按钮;标题色=白色;正文色=浅灰色(#e5e7eb);组件=圆角信息卡、细线引线、胶囊标签;光影=左前侧科技冷光,金属刀头高光,黑色机身细腻光泽。 [文字] 顶部主标题"使用步骤 简单易上手"(白色粗体大字),副标题"安装 通电 扫频 选档 切割 收纳"(浅灰色小字)。7个步骤:STEP01 安装刀片-断电拧松顶紧螺丝 装入刀片并按方向要求固定;STEP02 连接电源-放平主机 保持散热孔无遮挡 连接原装电源 电源指示灯亮红灯;STEP03 等待扫频-档位灯闪烁开始扫频 熄灭后进入待机状态;STEP04 选择档位-点按按键切换档位 对应档位指示灯亮;STEP05 开始切割-连续模式 双击按键 工作指示灯亮 开始切割 点动模式 按住按键 工作指示灯闪烁 开始切割;STEP06 停止切割-连续模式 双击按键 工作指示灯熄灭 停止切割 点动模式 松开按键 工作指示灯熄灭 停止切割;STEP07 冷却收纳-停止后待风扇停止转动 再断电 清理收纳。 [规格] 图片比例3:4竖版,4K,避免变形、错字、文字过小、冷蓝偏色、产品颜色改变、结构失真、水印、平台Logo。[详情页-9] 使用步骤,7步操作流程说明。
[商品] 使用图1产品图,切割刀主机置于画面顶部,保留全部外观结构。
[画面] 页面目标:清晰展示从安装到收纳的完整操作流程。顶部产品图+标题,下方纵向排列7个步骤,每个步骤左侧有圆形STEP编号(01-07),右侧为步骤标题和简短说明。步骤编号用黄色底部装饰。背景深蓝色。
[视觉] 套系策略:风格=国内五金器械专业科技商业摄影;标题字=现代无衬线粗体;正文字=简洁无衬线体;主色=深蓝色(#1a56db);背景延展=基于深蓝色做深浅层级渐变、科技几何切面和声波波纹暗纹;强调色=橙色(#f97316),仅用于小面积图标、引线、标签和重点按钮;标题色=白色;正文色=浅灰色(#e5e7eb);组件=圆角信息卡、细线引线、胶囊标签;光影=左前侧科技冷光,金属刀头高光,黑色机身细腻光泽。
[文字] 顶部主标题"使用步骤 简单易上手"(白色粗体大字),副标题"安装 通电 扫频 选档 切割 收纳"(浅灰色小字)。7个步骤:STEP01 安装刀片-断电拧松顶紧螺丝 装入刀片并按方向要求固定;STEP02 连接电源-放平主机 保持散热孔无遮挡 连接原装电源 电源指示灯亮红灯;STEP03 等待扫频-档位灯闪烁开始扫频 熄灭后进入待机状态;STEP04 选择档位-点按按键切换档位 对应档位指示灯亮;STEP05 开始切割-连续模式 双击按键 工作指示灯亮 开始切割 点动模式 按住按键 工作指示灯闪烁 开始切割;STEP06 停止切割-连续模式 双击按键 工作指示灯熄灭 停止切割 点动模式 松开按键 工作指示灯熄灭 停止切割;STEP07 冷却收纳-停止后待风扇停止转动 再断电 清理收纳。
[规格] 图片比例3:4竖版,4K,避免变形、错字、文字过小、冷蓝偏色、产品颜色改变、结构失真、水印、平台Logo。
[详情页-9] 使用步骤,7步操作流程说明。 [商品] 使用图1产品图,切割刀主机置于画面顶部,保留全部外观结构。 [画面] 页面目标:清晰展示从安装到收纳的完整操作流程。顶部产品图+标题,下方纵向排列7个步骤,每个步骤左侧有圆形STEP编号(01-07),右侧为步骤标题和简短说明。步骤编号用黄色底部装饰。背景深蓝色。 [视觉] 套系策略:风格=国内五金器械专业科技商业摄影;标题字=现代无衬线粗体;正文字=简洁无衬线体;主色=深蓝色(#1a56db);背景延展=基于深蓝色做深浅层级渐变、科技几何切面和声波波纹暗纹;强调色=橙色(#f97316),仅用于小面积图标、引线、标签和重点按钮;标题色=白色;正文色=浅灰色(#e5e7eb);组件=圆角信息卡、细线引线、胶囊标签;光影=左前侧科技冷光,金属刀头高光,黑色机身细腻光泽。 [文字] 顶部主标题"使用步骤 简单易上手"(白色粗体大字),副标题"安装 通电 扫频 选档 切割 收纳"(浅灰色小字)。7个步骤:STEP01 安装刀片-断电拧松顶紧螺丝 装入刀片并按方向要求固定;STEP02 连接电源-放平主机 保持散热孔无遮挡 连接原装电源 电源指示灯亮红灯;STEP03 等待扫频-档位灯闪烁开始扫频 熄灭后进入待机状态;STEP04 选择档位-点按按键切换档位 对应档位指示灯亮;STEP05 开始切割-连续模式 双击按键 工作指示灯亮 开始切割 点动模式 按住按键 工作指示灯闪烁 开始切割;STEP06 停止切割-连续模式 双击按键 工作指示灯熄灭 停止切割 点动模式 松开按键 工作指示灯熄灭 停止切割;STEP07 冷却收纳-停止后待风扇停止转动 再断电 清理收纳。 [规格] 图片比例3:4竖版,4K,避免变形、错字、文字过小、冷蓝偏色、产品颜色改变、结构失真、水印、平台Logo。[详情页-9] 使用步骤,7步操作流程说明。
[商品] 使用图1产品图,切割刀主机置于画面顶部,保留全部外观结构。
[画面] 页面目标:清晰展示从安装到收纳的完整操作流程。顶部产品图+标题,下方纵向排列7个步骤,每个步骤左侧有圆形STEP编号(01-07),右侧为步骤标题和简短说明。步骤编号用黄色底部装饰。背景深蓝色。
[视觉] 套系策略:风格=国内五金器械专业科技商业摄影;标题字=现代无衬线粗体;正文字=简洁无衬线体;主色=深蓝色(#1a56db);背景延展=基于深蓝色做深浅层级渐变、科技几何切面和声波波纹暗纹;强调色=橙色(#f97316),仅用于小面积图标、引线、标签和重点按钮;标题色=白色;正文色=浅灰色(#e5e7eb);组件=圆角信息卡、细线引线、胶囊标签;光影=左前侧科技冷光,金属刀头高光,黑色机身细腻光泽。
[文字] 顶部主标题"使用步骤 简单易上手"(白色粗体大字),副标题"安装 通电 扫频 选档 切割 收纳"(浅灰色小字)。7个步骤:STEP01 安装刀片-断电拧松顶紧螺丝 装入刀片并按方向要求固定;STEP02 连接电源-放平主机 保持散热孔无遮挡 连接原装电源 电源指示灯亮红灯;STEP03 等待扫频-档位灯闪烁开始扫频 熄灭后进入待机状态;STEP04 选择档位-点按按键切换档位 对应档位指示灯亮;STEP05 开始切割-连续模式 双击按键 工作指示灯亮 开始切割 点动模式 按住按键 工作指示灯闪烁 开始切割;STEP06 停止切割-连续模式 双击按键 工作指示灯熄灭 停止切割 点动模式 松开按键 工作指示灯熄灭 停止切割;STEP07 冷却收纳-停止后待风扇停止转动 再断电 清理收纳。
[规格] 图片比例3:4竖版,4K,避免变形、错字、文字过小、冷蓝偏色、产品颜色改变、结构失真、水印、平台Logo。
[第2屏] Core features overview - Braided USB-C Fast Charging Cable 4 key benefits. This screen uses [image1] as the product reference. [Atmosphere/Style] Clean tech infographic style, dark navy background with subtle gradient, modern and informative, commercial quality. [Element Layout] Product cable featured in upper right area (about 30% of frame), showing one cable coiled neatly; four feature cards arranged in 2x2 grid on left and bottom; each card has a simple line icon and short description; product appearance matches input image: black braided, silver connectors, reinforced joints. [Lighting] Even soft lighting across the scene, subtle shadow under product, clean highlights on metallic parts, flat design feel for icon cards. [Color Palette] Global background #0F172A (dark navy); card backgrounds #1E293B (slightly lighter navy); accent color #3B82F6 electric blue; text color white and light gray. [Composition] Grid layout with 4 equal feature cards; product placed in upper right corner as visual anchor; balanced and symmetrical; reading flow: top title → feature grid → product. [Text Layout] Top center main title: "Why Choose Our Cable" in bold white; each feature card has icon + bold heading + short description: Card 1 - "Fast Charging" with lightning icon - "Supports high-speed charging for USB-C devices"; Card 2 - "Durable Braided" with shield icon - "Tangle-resistant nylon braided exterior"; Card 3 - "Reinforced Joints" with flex icon - "Stress relief design withstands bends"; Card 4 - "Universal Compatibility" with device icon - "Works with phones, tablets, laptops"; all text in English, clean sans-serif font. [Proportion/Resolution] 1:1 square ratio, 2K resolution, crisp text, high-definition quality. [Negative Prompt] Deformed product, missing parts, color deviation, watermark, garbled text, blurry product, Chinese characters, cluttered layout.[第2屏] Core features overview - Braided USB-C Fast Charging Cable 4 key benefits. This screen uses [image1] as the product reference.
[Atmosphere/Style] Clean tech infographic style, dark navy background with subtle gradient, modern and informative, commercial quality.
[Element Layout] Product cable featured in upper right area (about 30% of frame), showing one cable coiled neatly; four feature cards arranged in 2x2 grid on left and bottom; each card has a simple line icon and short description; product appearance matches input image: black braided, silver connectors, reinforced joints.
[Lighting] Even soft lighting across the scene, subtle shadow under product, clean highlights on metallic parts, flat design feel for icon cards.
[Color Palette] Global background #0F172A (dark navy); card backgrounds #1E293B (slightly lighter navy); accent color #3B82F6 electric blue; text color white and light gray.
[Composition] Grid layout with 4 equal feature cards; product placed in upper right corner as visual anchor; balanced and symmetrical; reading flow: top title → feature grid → product.
[Text Layout] Top center main title: "Why Choose Our Cable" in bold white; each feature card has icon + bold heading + short description: Card 1 - "Fast Charging" with lightning icon - "Supports high-speed charging for USB-C devices"; Card 2 - "Durable Braided" with shield icon - "Tangle-resistant nylon braided exterior"; Card 3 - "Reinforced Joints" with flex icon - "Stress relief design withstands bends"; Card 4 - "Universal Compatibility" with device icon - "Works with phones, tablets, laptops"; all text in English, clean sans-serif font.
[Proportion/Resolution] 1:1 square ratio, 2K resolution, crisp text, high-definition quality.
[Negative Prompt] Deformed product, missing parts, color deviation, watermark, garbled text, blurry product, Chinese characters, cluttered layout.